Before a client sends USDT or USDC, do not share only a wallet address. Confirm the exact stablecoin, network, receiving address, invoice amount, test-payment rule, fee responsibility, and transaction record. A wallet address becomes a payment instruction only after the token, network, amount, and payer details are verified.
A wallet address is not a complete payment instruction. And a screenshot is not complete payment proof.
If a client wants to pay you in USDT or USDC, they need the exact stablecoin, network, amount, receiving address, and payment reference. Sending only a long string of characters leaves too much room for mistakes.
Stablecoins have become more practical for freelancers who work with international clients, but the payment flow has also become easier to mess up. Regulation, network mismatch, wrong-chain transfers, address poisoning, and basic verification mistakes all need attention before money moves. This guide is educational, not legal or tax advice. It is here to help you reduce payment errors before they turn into a support nightmare, because apparently “digital dollars” still require a small operating manual.
Still deciding what to accept? Start with USDT vs USDC vs DAI. For the complete client-payment workflow, read how freelancers can get paid in USDT or USDC. If the network is the confusing part, use this guide to choosing the right network for USDT or USDC.
You may also need more than a wallet address when receiving funds through an exchange or platform. This guide explains the difference between a wallet address, memo, and destination tag.
To receive a stablecoin payment more safely, confirm the payer, stablecoin, network, amount, fee responsibility, and receiving address in writing. After pasting the address, compare it with the address displayed inside your wallet. For important transfers, receive a small test payment first. Save the network and transaction hash with the invoice after every payment.
The most important rule is simple:
A copied address is only text. It becomes a payment instruction after the token, network, address, amount, and payer details have been verified.
After a client says “sent,” do not mark the invoice as paid just because they shared a screenshot. Ask for the transaction hash, open the correct block explorer, confirm the network, receiving address, amount, and status, then save the record with the invoice.
Client says sent. What should you check next?
A stablecoin payment is not finished when a client says “sent.” It is also not confirmed just because they share a screenshot.
Before you mark an invoice as paid, ask for the transaction hash and check the payment on the correct block explorer. The goal is simple: confirm that the payment happened on the agreed network, reached your receiving address, used the right token, matched the invoice amount, and has a successful or confirmed status.
Use this after-payment checklist:
Ask for the transaction hash, not only a screenshot.
Confirm the exact network the client used.
Open the correct block explorer for that network.
Match the receiving address with the wallet address you gave the client.
Match the token and amount with the invoice.
Check the transaction status: pending, failed, successful, or confirmed.
Save the transaction hash, network, token, amount, date, invoice number, and client name.
A screenshot can be useful for context. It should not be your only proof. The transaction hash, correct network, explorer status, receiving address, and amount are what help you verify what actually happened.
If you are not sure how to check a transaction hash, read How to Read a Crypto Transaction on a Block Explorer.
Before payment vs after payment checklist
Stage | What to check | Why it matters |
|---|---|---|
Before payment | Token, network, wallet address, amount, and invoice reference | Prevents wrong-token, wrong-network, wrong-address, and unclear-invoice mistakes. |
Before payment | Small test payment for new clients or new payment routes | Confirms the route before the full amount moves. |
After client says “sent” | Transaction hash | Gives you an onchain payment record, not just a screenshot. |
After client says “sent” | Correct block explorer for the network used | Prevents checking the right transaction on the wrong chain. |
After client says “sent” | Receiving address | Confirms the payment went to your wallet address, not to a similar-looking or incorrect address. |
After client says “sent” | Amount, token, and transaction status | Helps confirm whether the invoice can actually be marked as paid. |
After payment | Saved record: transaction hash, network, date, amount, token, invoice number, and client name | Helps with accounting, support conversations, disputes, and future payment reviews. |
The safest habit is simple: before payment, make the instructions clear; after payment, verify the proof.
What should you confirm before sharing a wallet address?
Before sharing an address, confirm the payer’s identity, exact stablecoin, exact network, invoice amount, fee responsibility, and payment purpose. The client should never have to guess which version of USDT or USDC you support.
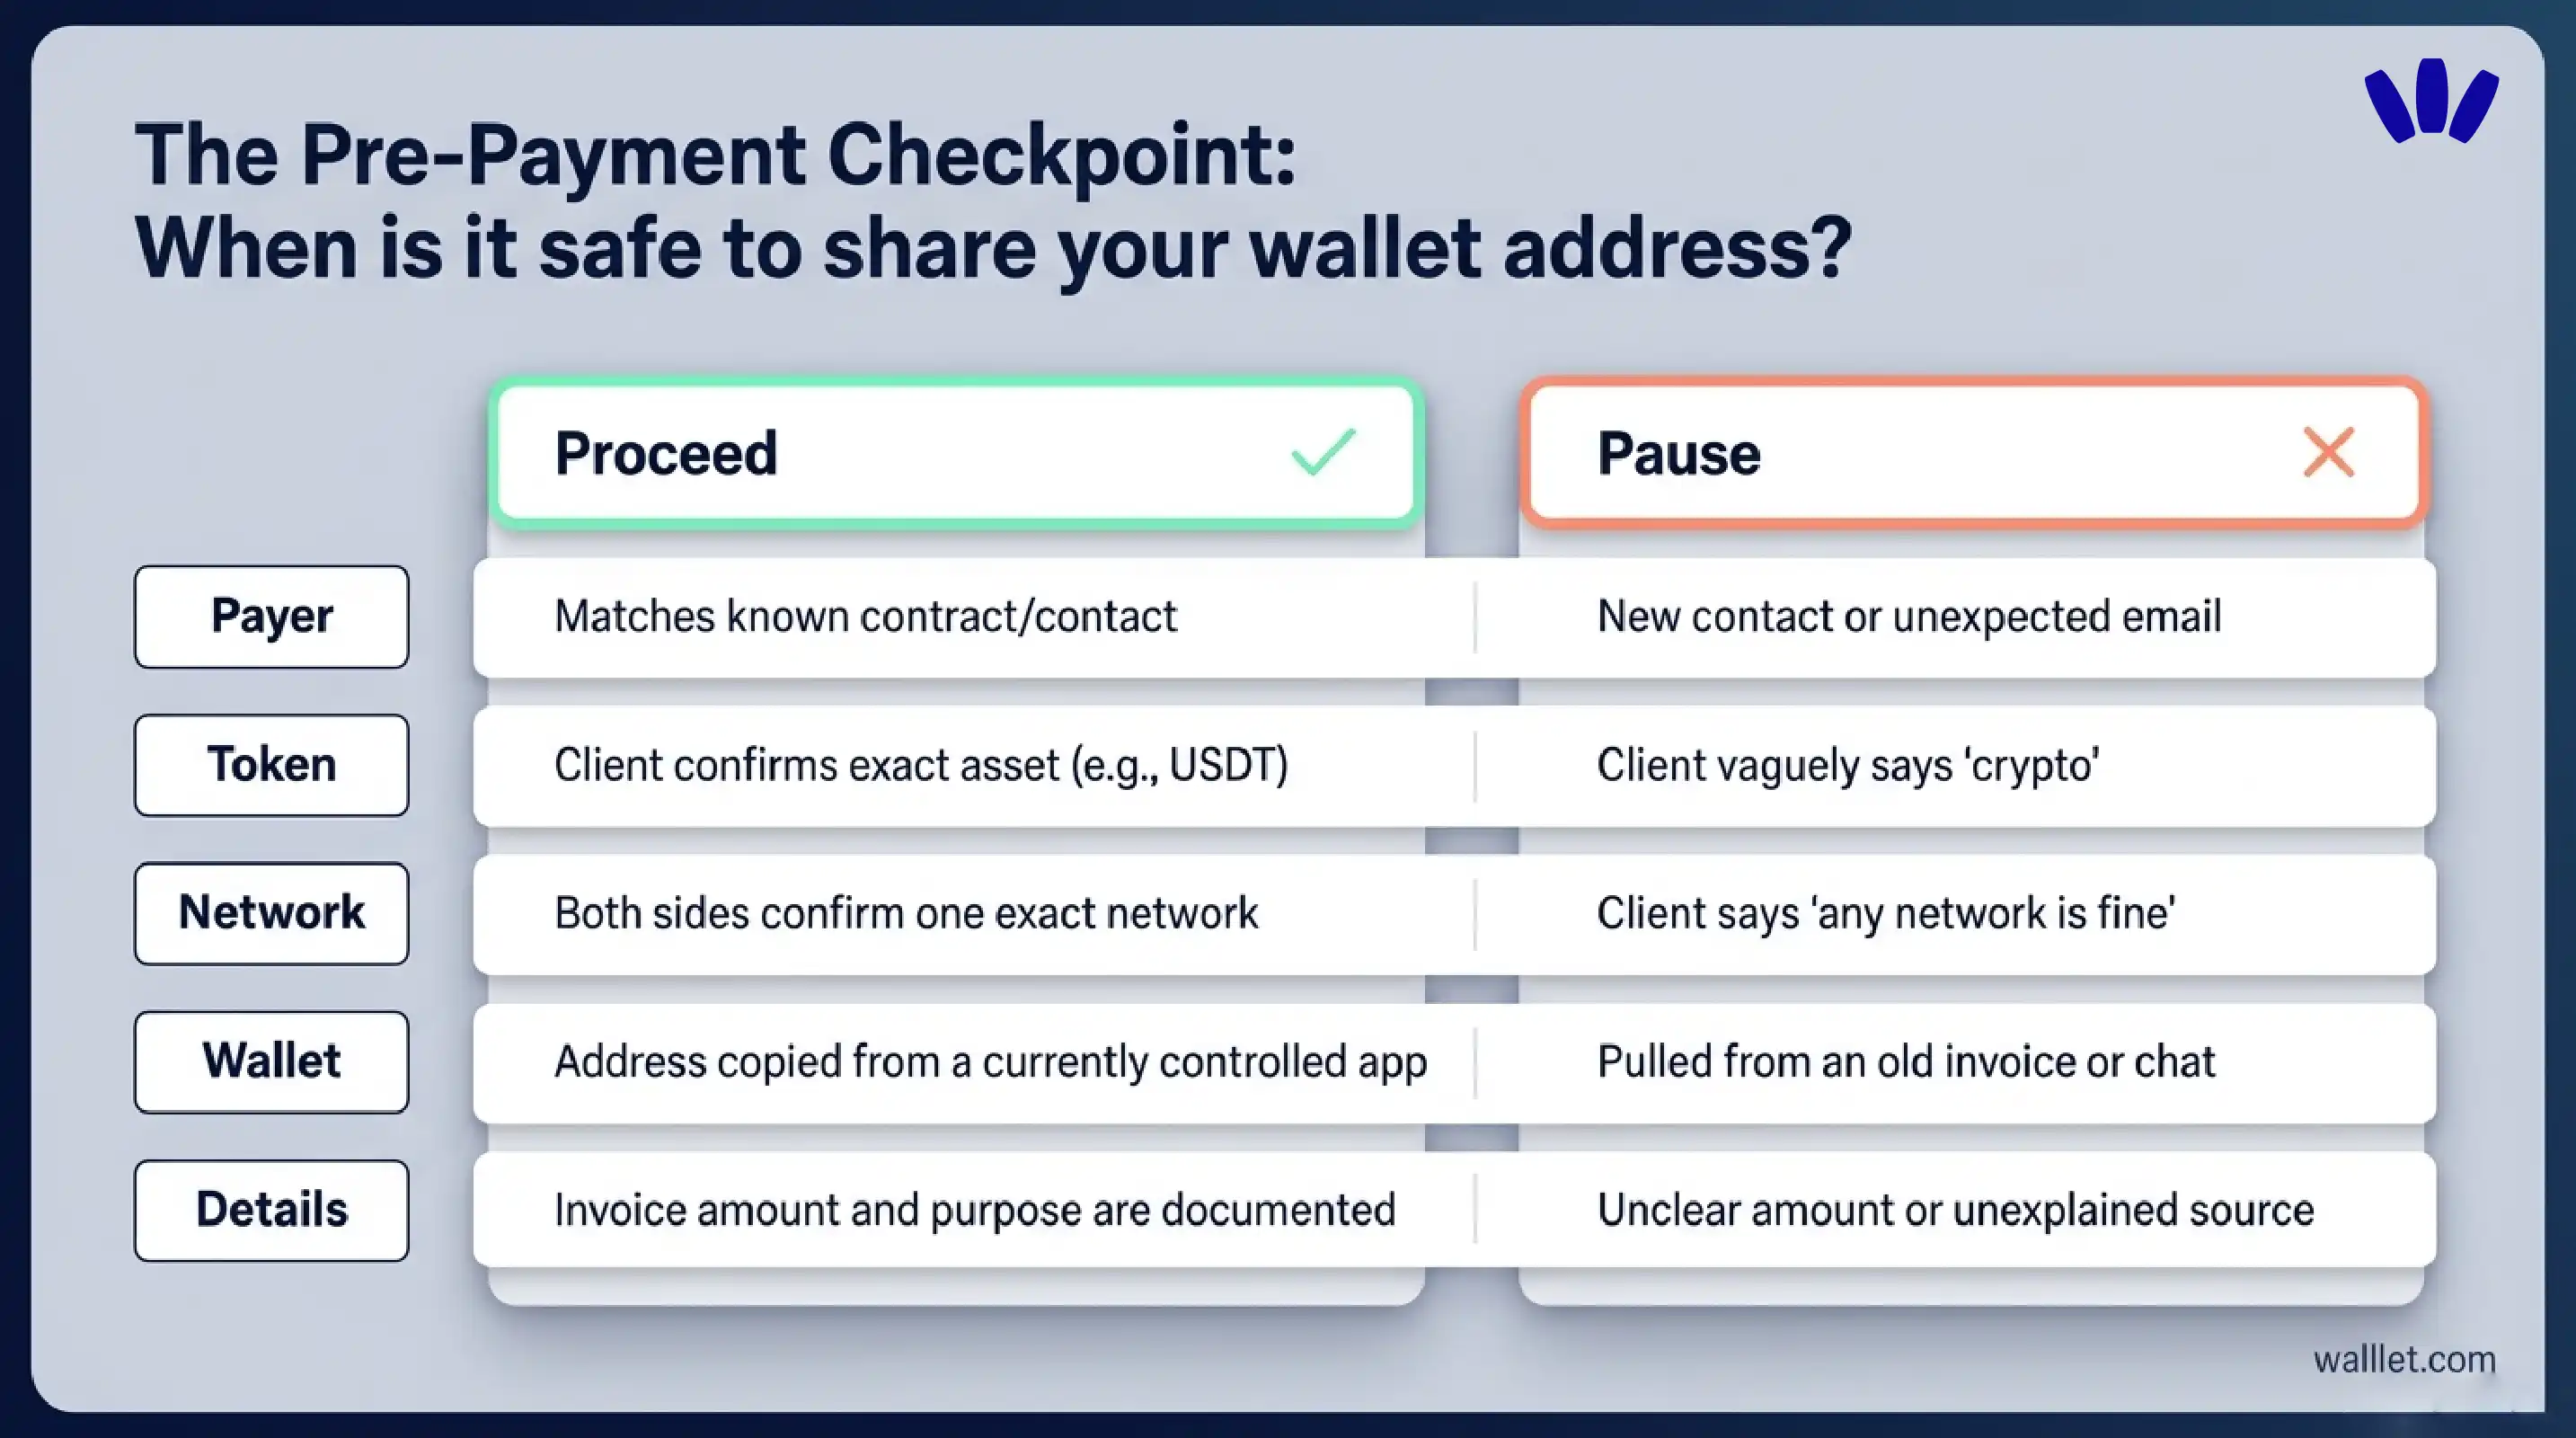
If the stablecoin and network have not been confirmed in writing, do not send the receiving address yet. Use this go-or-stop check:
Checkpoint | Go | Stop |
Payer | The person matches the client, contract, or known payment contact. | A new contact appears or the payment email changes unexpectedly. |
Stablecoin | The client confirms USDT, USDC, or another agreed asset. | The client says only “crypto” or “dollars.” |
Network | Both sides confirm one exact network. | The client says “any network is fine.” |
Wallet | The address comes from a wallet you currently control. | It comes from an old invoice, screenshot, chat, or note. |
Amount | The token amount and invoice value are clear. | The payment amount is unclear or changes without explanation. |
Fee responsibility | You agree who pays the network fee. | The client assumes one thing and you assume another. Excellent teamwork, if the goal is confusion. |
Purpose | The invoice and service are documented. | The source or purpose of the payment cannot be explained. |
A short written confirmation is cheaper than a wrong-network recovery attempt. Such recoveries are not always possible.
What should a stablecoin payment instruction include?
A complete stablecoin payment instruction should be easy to copy, easy to verify, and hard to misread. Use one stablecoin, one network, one receiving address, one invoice reference, and one verified support channel.
For a new client or meaningful amount, require a small test payment before the client sends the remaining balance. Copy this format:
Stablecoin: [USDT / USDC]
Network: [exact network]
Receiving address: [wallet address copied from your current receive screen]
Invoice reference: [invoice number / client name / project code]
Amount: [stablecoin amount]
Test amount: [small test amount]
Network fee: [who pays the network fee]
After payment: please send the transaction hash
Support channel: [verified email / verified chat / approved contact method]
Here is a reusable client message:
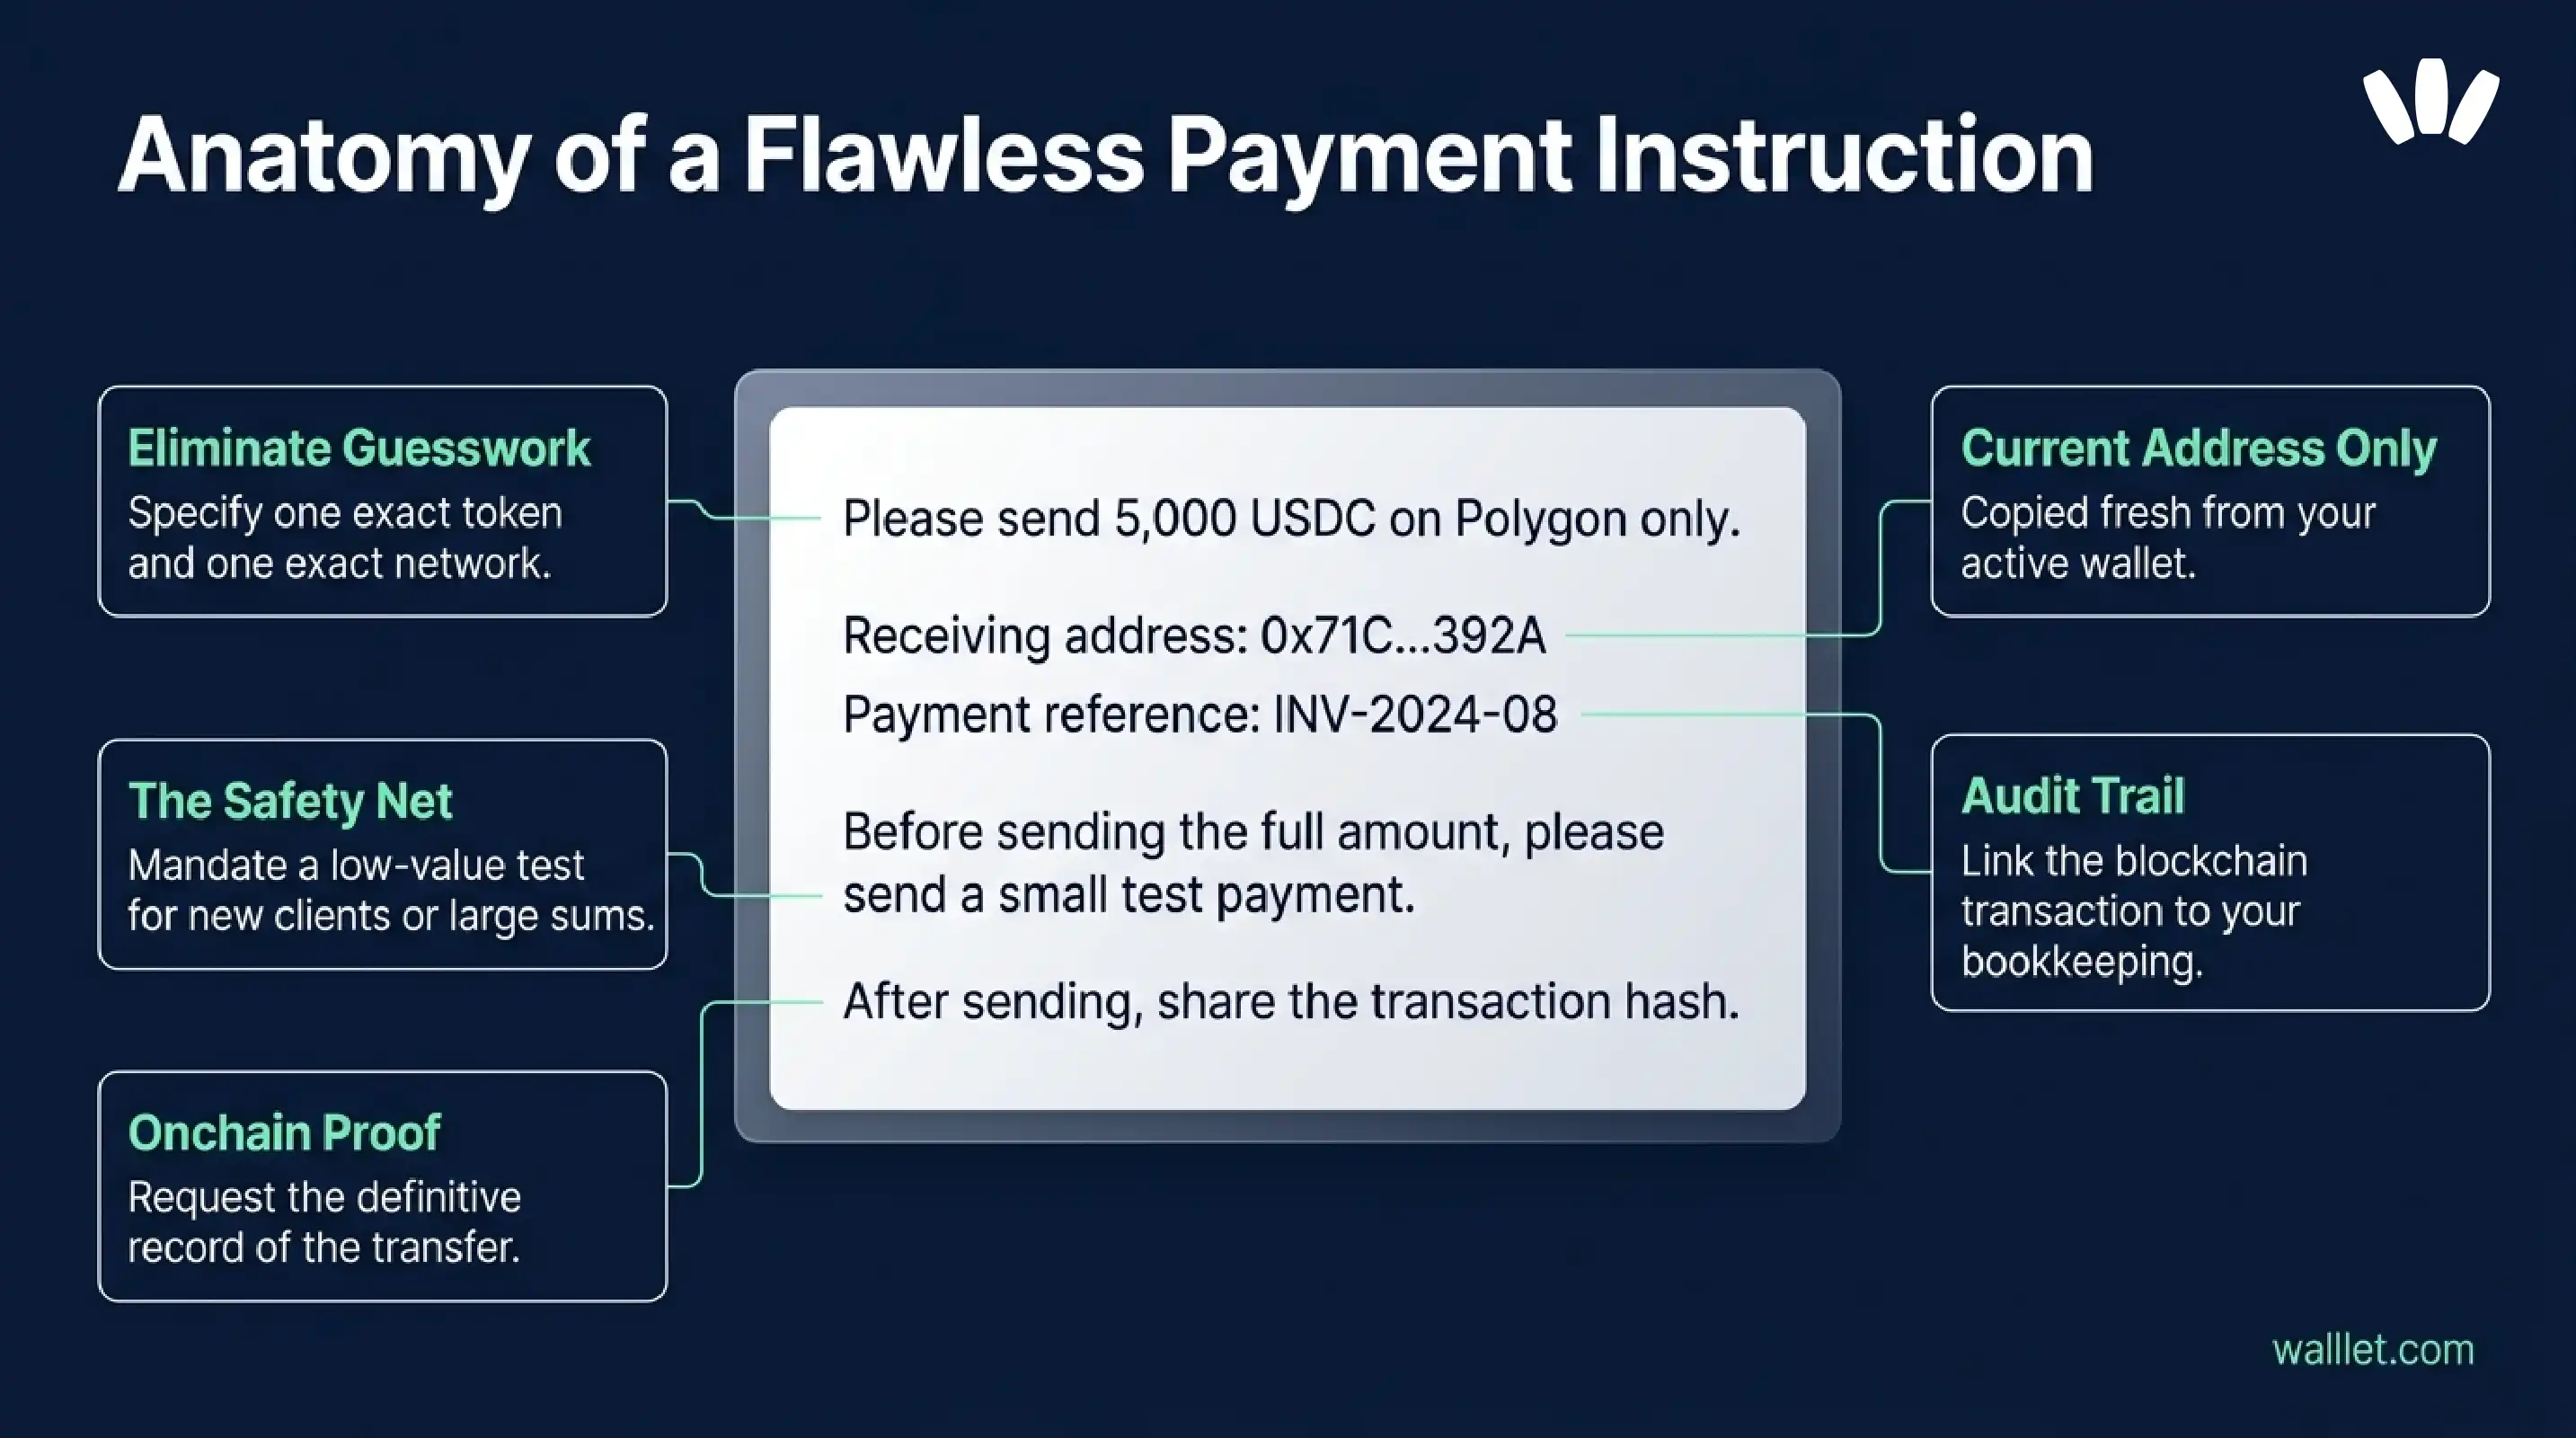
Please send [amount] [USDT/USDC] on [network] only.
Receiving address: [WALLET ADDRESS]
Do not use a different token or network.
Payment reference: [INVOICE NUMBER]
For a new route or important payment, please send a small test payment first. After sending, please share the transaction hash and confirm the network used. I will mark the invoice as paid after the transaction is confirmed on the agreed network and the receiving address, token, and amount match the invoice.
A wallet address is not enough
“Send USDT here” is a bad payment instruction.
USDT and USDC can move on different networks. USDT on Tron is not the same payment route as USDT on Ethereum. USDT on Base, BNB Smart Chain, or another supported network also needs its own network context. The same problem applies to USDC across Ethereum, Base, Arbitrum, Polygon, and other networks.
The token name alone does not tell the client where to send the payment. The address alone does not tell the client which network to choose.
A client may see several withdrawal options inside an exchange and pick the cheapest one. That can be reasonable from their side and still wrong for your receiving setup. Human interfaces, bravely continuing their war against clarity.
For stablecoin payments, write the instruction as:
Send [USDT/USDC] on [exact network] to [receiving address].
Do not use another network.
If the client asks which network to use, do not improvise inside a chat thread. Check what their sending wallet or exchange supports, check what your receiving wallet supports, and choose one route for that invoice.
For a deeper network choice breakdown, read Best Network to Send USDC or USDT: How to Pick the Right Chain.
How should you verify a wallet address after pasting it?
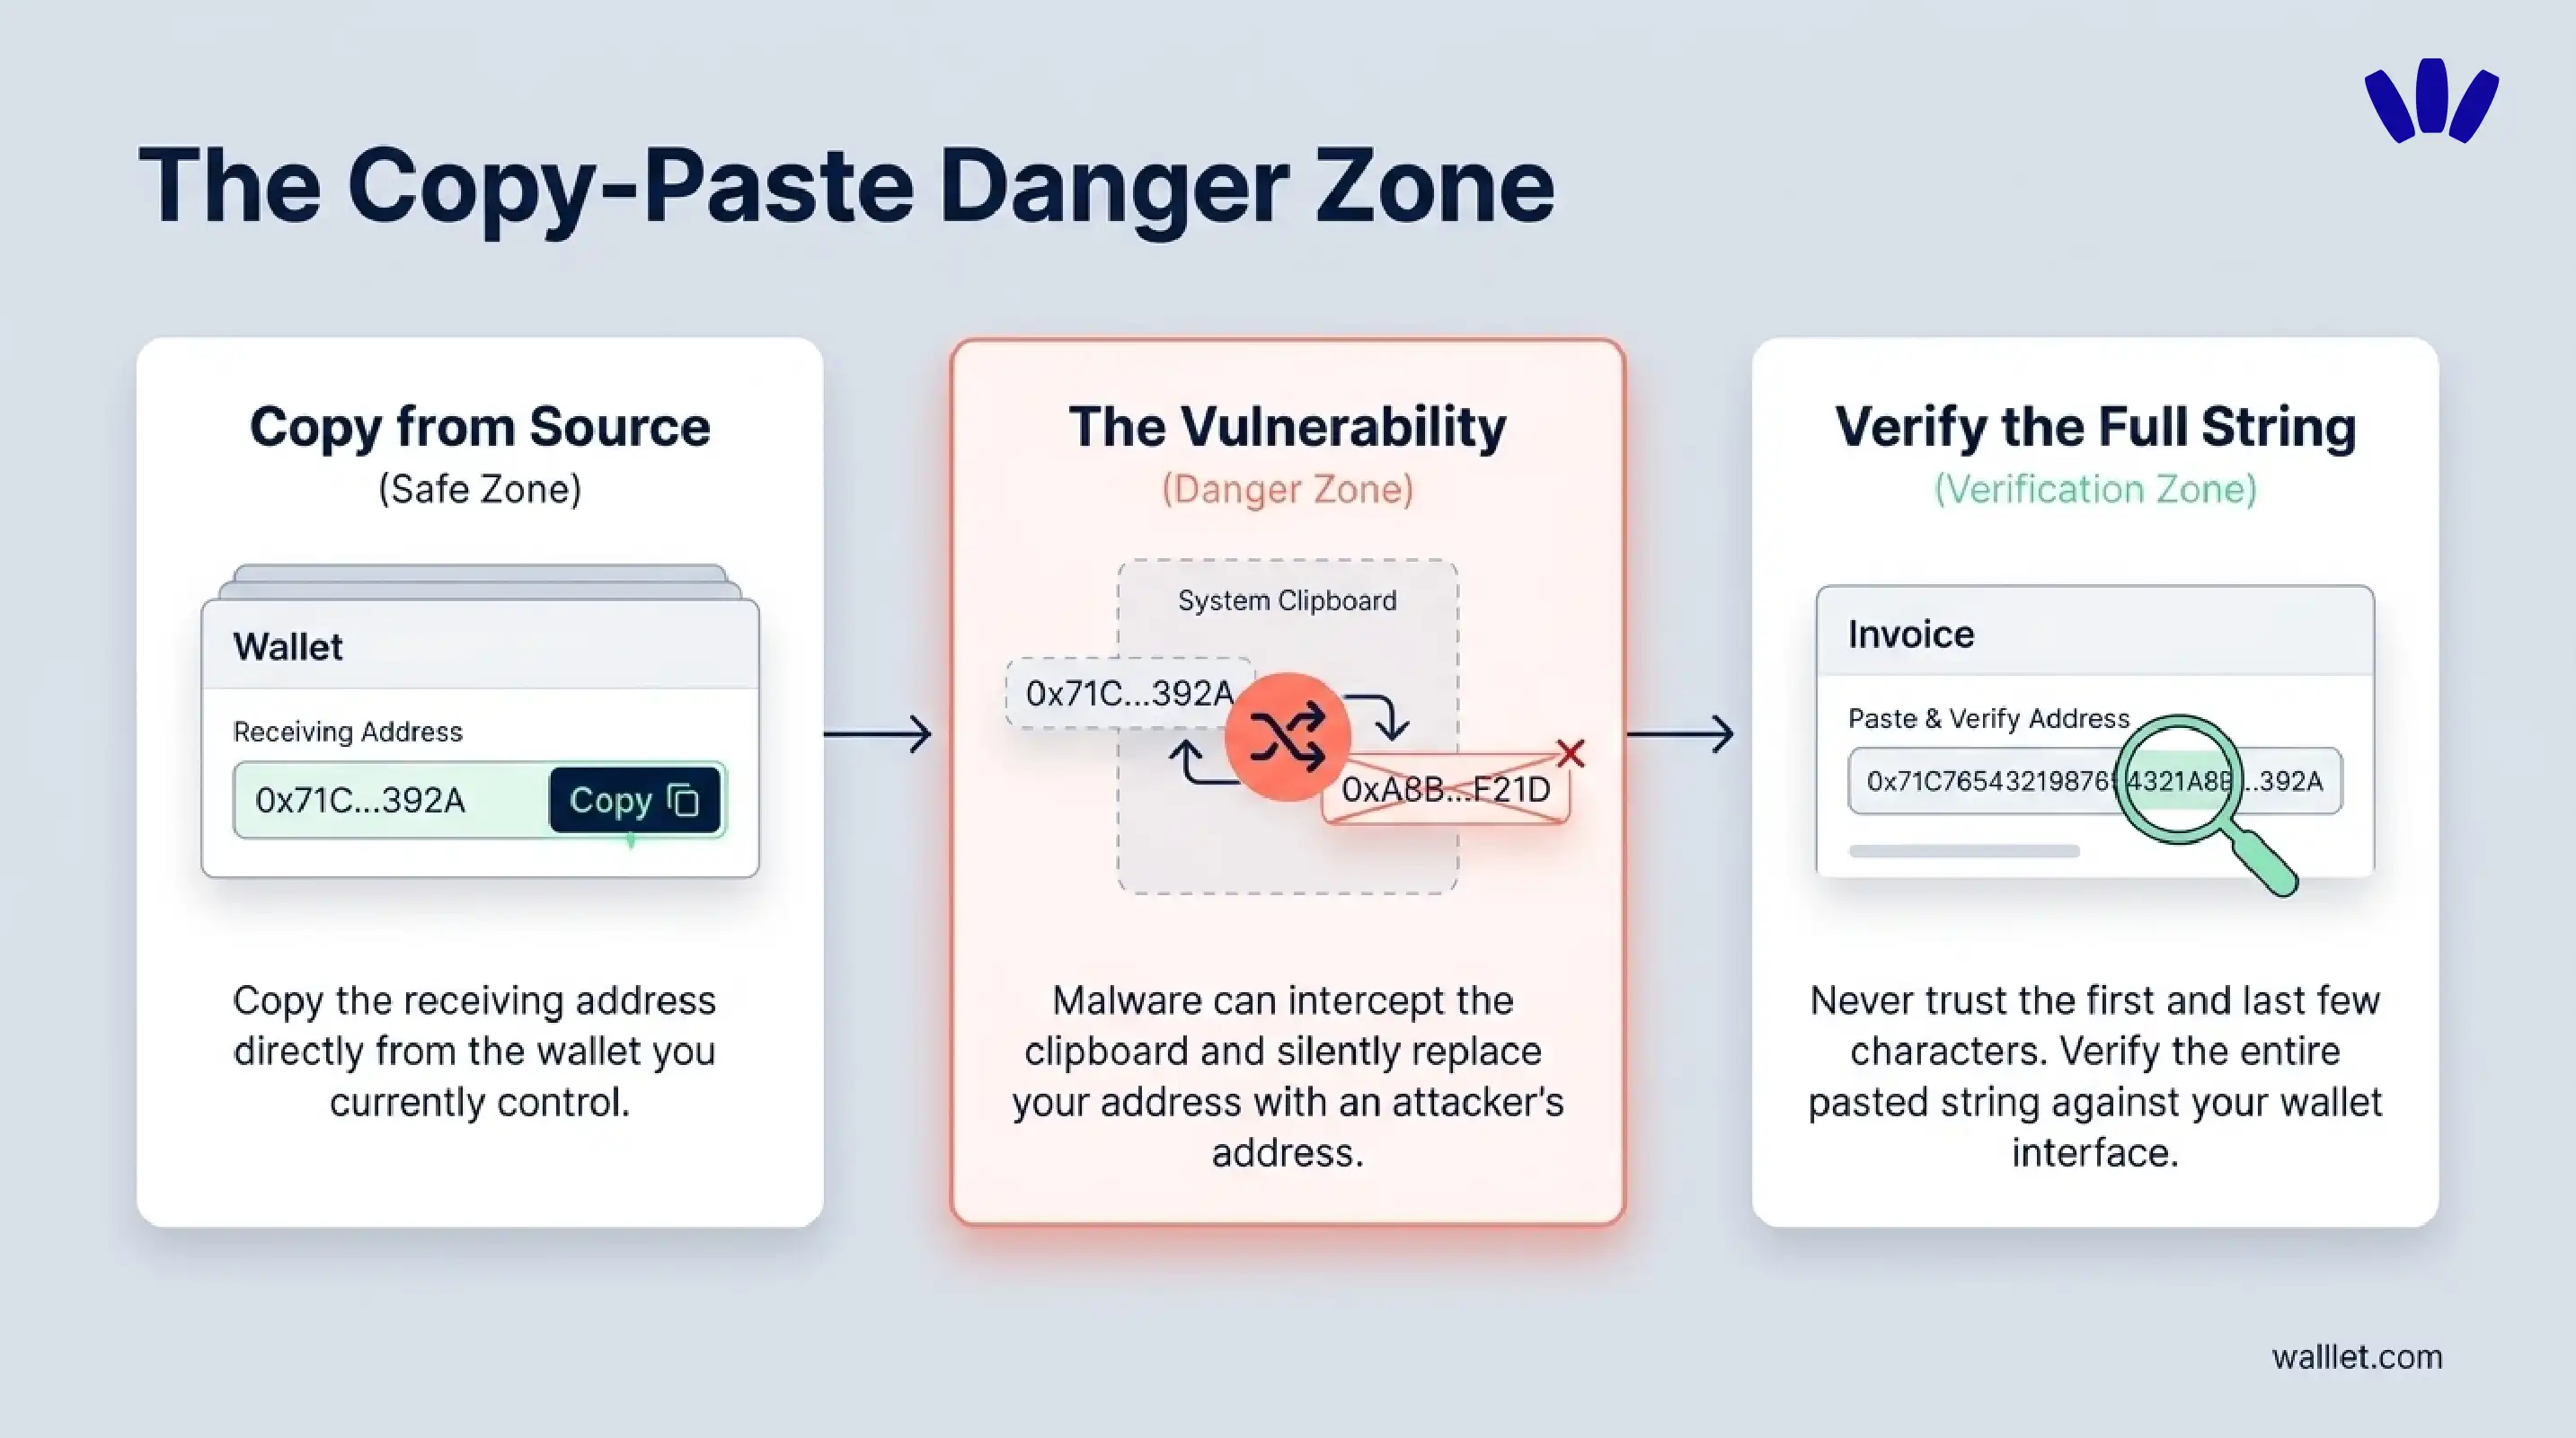
After pasting a wallet address into an invoice, email, chat, or payment form, compare it again with the address displayed inside your receiving wallet. Do not rely only on the first and last few characters for an important payment.
Follow this routine every time.
1. Copy the address from the wallet you currently control
Open the correct wallet, account, asset, and network. Do not copy a receiving address from:
An old invoice
A previous client conversation
A screenshot
A spreadsheet that has not been checked recently
A forwarded message
Your memory, because human memory has signed up for work it cannot perform
Even when you expect the address to be unchanged, check it inside the wallet again.
2. Paste the address into the final payment message
Paste the address into the actual invoice, email, or message that will be sent. Do not verify it only before copying. The important comparison happens after Paste. Copying an address and pasting an address are two separate actions. The text that appears after Paste is what the client will actually use.
3. Compare as much of the full address as possible
Checking the first and last few characters is useful for a quick scan, but it is not a complete verification process. For an important payment:
Expand any shortened or hidden address.
Compare the pasted address with the address shown inside your wallet.
Check the full string character by character when practical.
Use a trusted plain-text field if an app shortens the address.
Recheck the address after editing, forwarding, or reformatting the message.
Use a second trusted device for an additional check when the amount justifies it.
The first and last characters can help you notice an obvious mistake. They should not create false confidence about everything in between.
4. Confirm the network beside the address
A correctly copied address does not make the selected network correct. Check that:
The client is sending the agreed stablecoin.
The client is using the agreed network.
Your wallet supports that stablecoin on that network.
The address belongs to the intended receiving account.
The network shown in the wallet matches the network written in the invoice.
Some EVM-compatible networks use addresses with the same 0x format. The address may look valid while the funds still arrive on a network you were not expecting.
5. Treat an unexpected address change as a security incident
A device infected with Crypto Clipper malware may monitor copied wallet addresses and replace them with an attacker’s address. Microsoft Threat Intelligence has documented a crypto clipper campaign involving clipboard theft and wallet-address substitution.
If the pasted address does not match the address displayed in your wallet:
Stop the payment process.
Do not keep copying and pasting until it appears correct.
Do not send or request any funds from that device.
Disconnect the device from sensitive financial activity.
Update its operating system and security software.
Scan it for malware.
Repeat the process from a trusted device.
Change relevant account credentials if compromise is suspected.
An unexplained address change is not a formatting issue. Treat it as evidence that the device or communication flow may be compromised.
For a broader security setup, read how to protect your crypto wallet.
Warning: Do not copy a receiving address from transaction history. Address poisoning scams can place lookalike addresses in your wallet history and wait for you to copy the wrong one later. Use the receive screen inside your wallet or a saved contact you have already verified. Read the full guide: Address Poisoning Scams: The Copy-Paste Trap That Drains Crypto Wallets.
When should you ask for a test payment?
Request a small test payment when the client is new, the amount is important, the wallet or network has changed, or either side is unfamiliar with the payment flow.
The test must use the same stablecoin, network, and receiving address as the final transfer. A test payment is especially useful when:
This is the first payment from the client.
The client has not used stablecoins before.
You are using a new wallet.
You are receiving funds on a new network.
Your receiving address has changed.
The client is sending from a new exchange or platform.
A mistake would create a meaningful financial loss.
Either side is uncertain about the process.
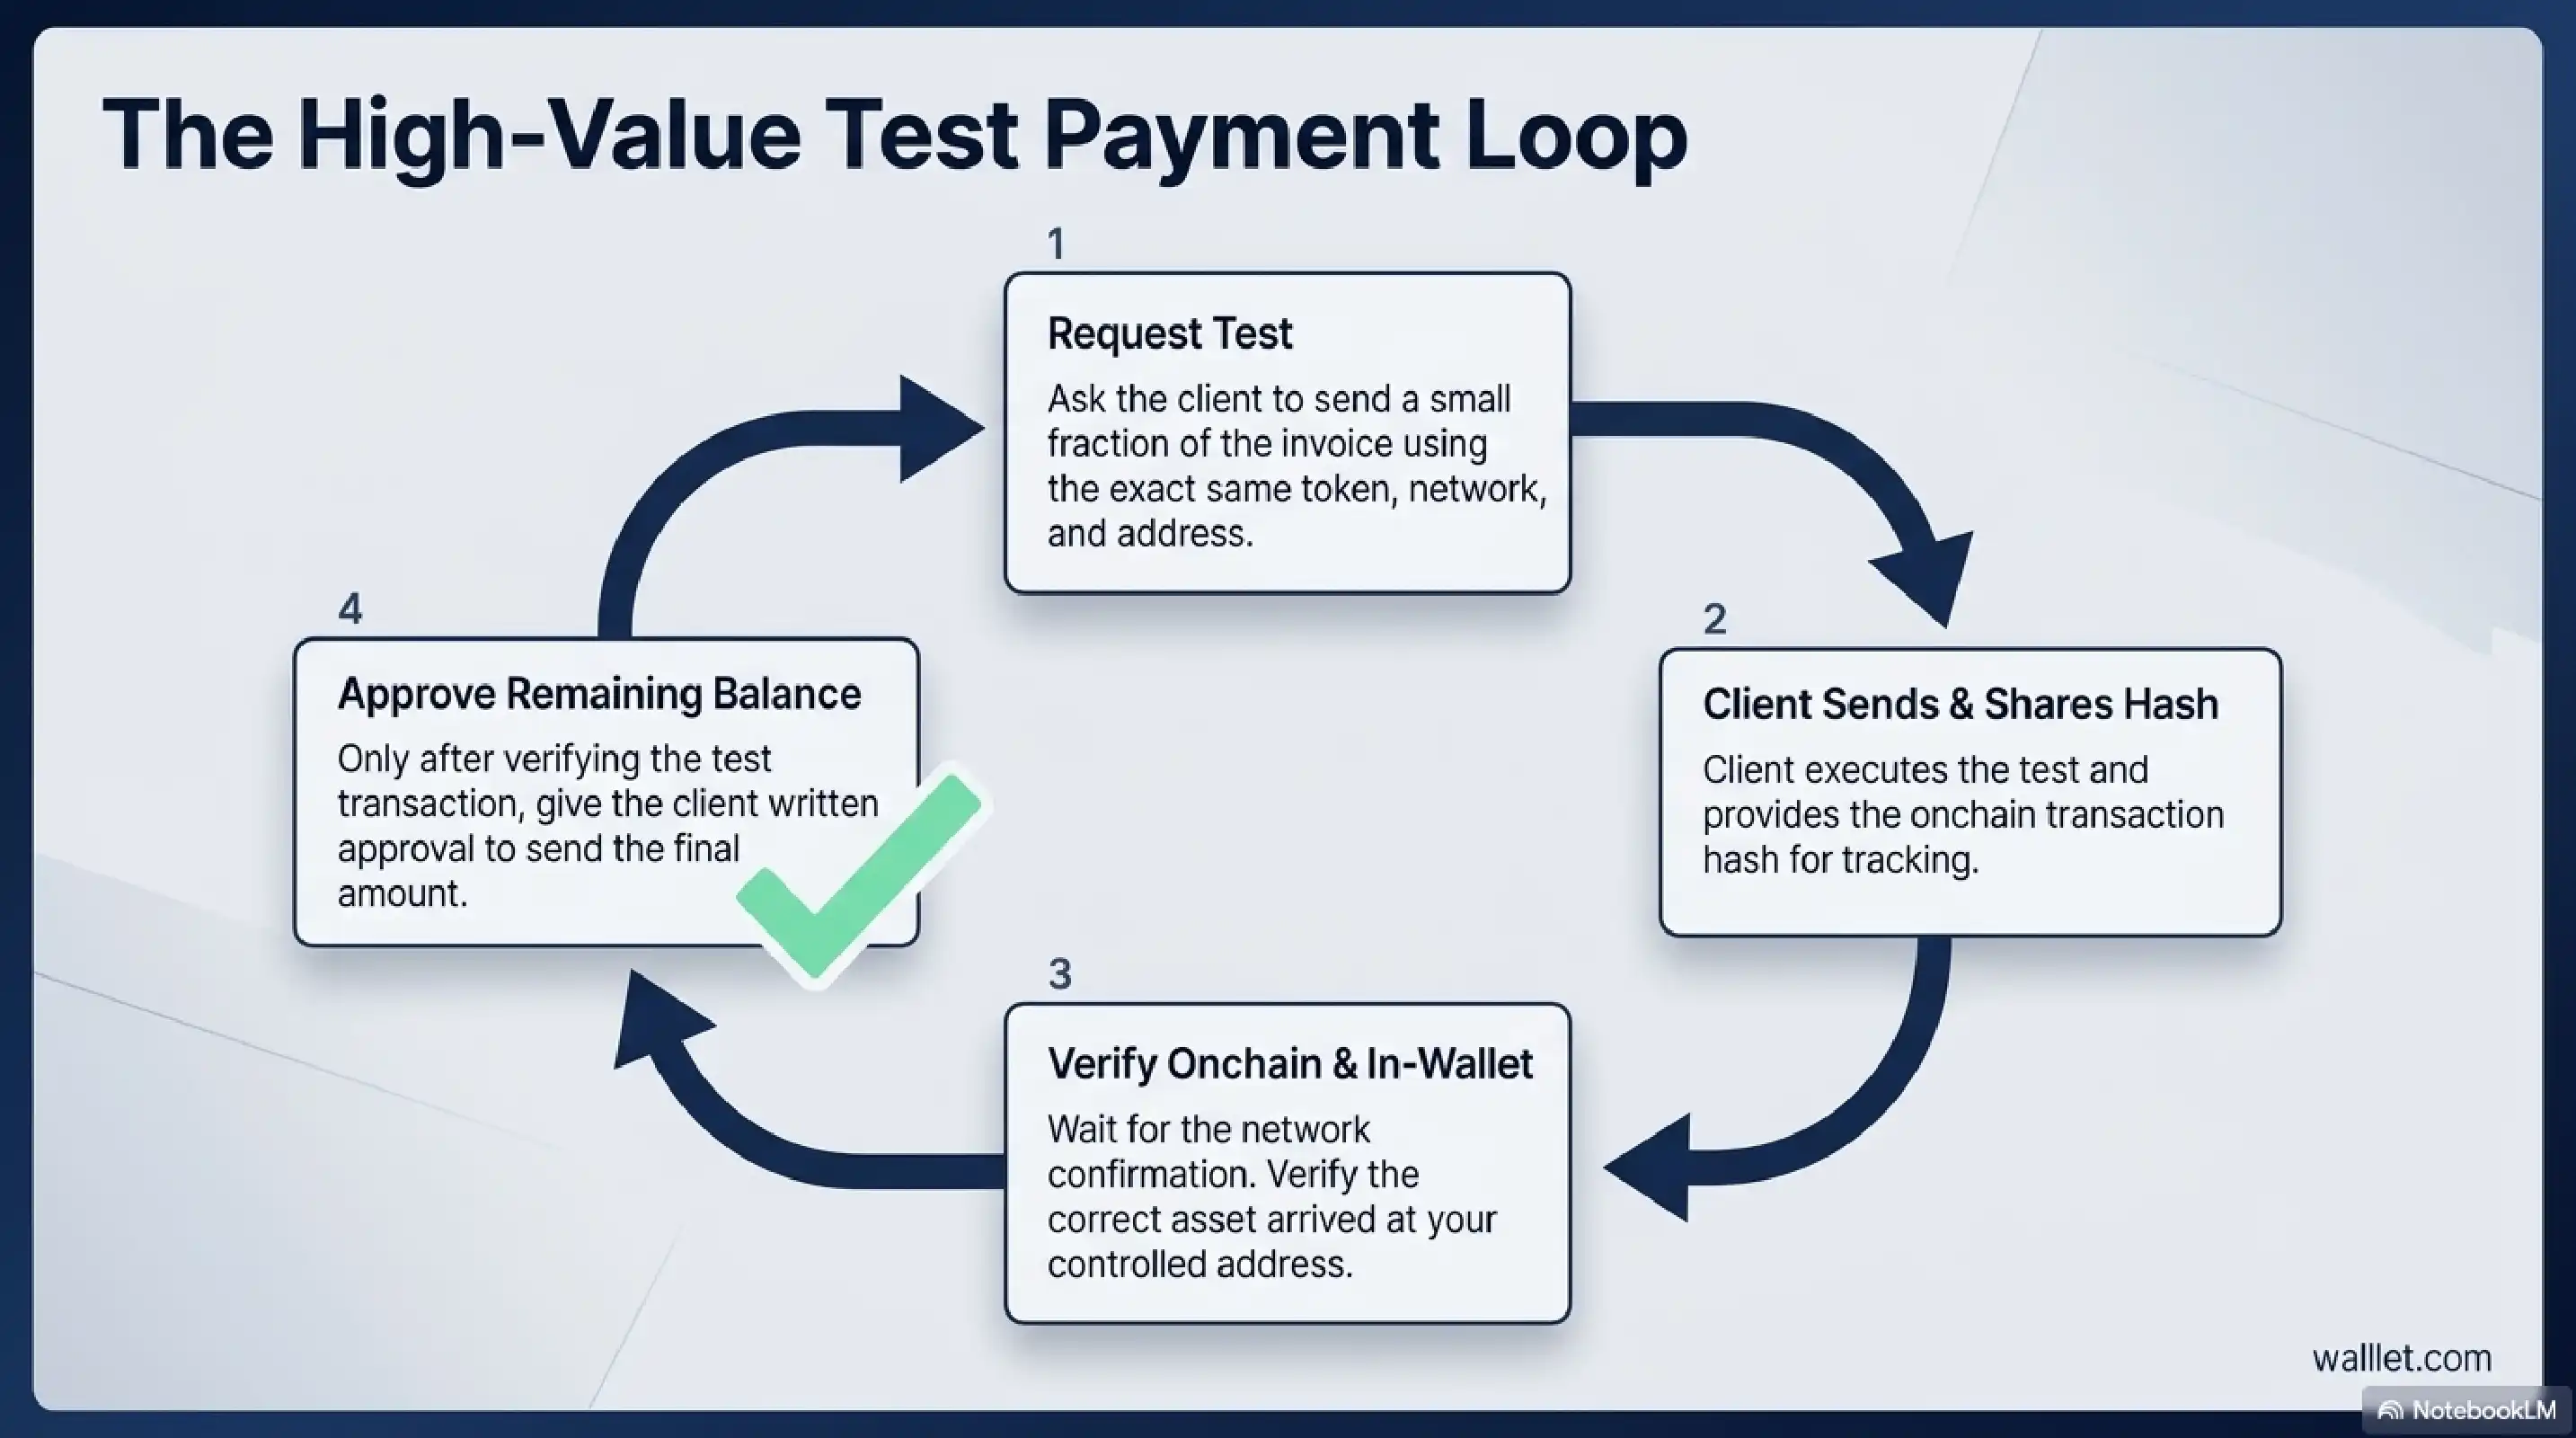
Use this sequence:
Confirm the stablecoin, network, address, amount, and fee responsibility.
Ask the client to send a small test payment.
Wait until the transaction appears on the correct network.
Verify the stablecoin, receiving address, amount, and transaction status.
Save the test transaction hash.
Confirm in writing that the client can send the remaining balance.
Save the final transaction hash separately.
The test payment is not finished until you have checked the transaction hash on the correct explorer.
There is no universal test amount. It should be large enough to appear clearly after applicable fees, but small enough that an error would not create a serious loss. A test payment is an additional safety check. It does not replace address and network verification.
After the client pays, verify before you mark the invoice as paid
Do not mark the invoice as paid just because the client says “sent.” After the client pays, check the transaction before updating your records. You need to verify:
Transaction status
Token
Network
Receiving address
Amount
Transaction hash
Invoice reference
Start with the transaction hash. Open it in a block explorer for the network that was used. If the client sent USDT on Tron, use a Tron explorer. If they sent USDC on Base, use a Base explorer. The wrong explorer can make a real payment look missing, because apparently even checking a payment has a network choice.
The transaction should show the expected token, receiving address, amount, and status. Then compare it with the invoice. For a step-by-step reading process, use How to Read a Crypto Transaction on a Block Explorer.
If the blockchain shows a successful payment but your wallet balance does not update, follow these steps for a crypto wallet that is not showing the expected balance.
Why should you save the transaction hash?
A transaction hash is the payment record you can check later. If a client says they sent USDT or USDC, the transaction hash helps you verify what actually happened on the network instead of relying only on a screenshot, message, or wallet notification.
When you save the transaction hash together with the network used, you can usually check:
whether the transaction was successful, pending, or failed
which address sent the payment
which address received the payment
the token and amount transferred
the date and time of the transaction
the block explorer record for future reference
This matters because stablecoin payments can become confusing when the wrong network is used, the wallet balance has not updated yet, or the client sends an unclear screenshot. The transaction hash gives you a cleaner way to verify the payment and keep a record tied to the invoice.
For client payments, save the transaction hash with the invoice number, client name, token, network, amount, and date. This gives you a simple payment trail if you need to check the transaction again later, answer a client question, review your income records, or contact wallet or platform support.
A good rule: do not treat a stablecoin invoice as fully checked until the transaction hash, network, receiving address, token, amount, and status match the payment instruction you gave the client.
Should you offer the client several network options?
For most client payments, use one stablecoin, one network, one address, and one invoice reference. Offering several networks may feel flexible, but it forces the client to make a technical choice while sending money. Ask which networks the client can use, check what your wallet supports, and select one route for that invoice. Use this workflow:
Ask which networks the client’s wallet or exchange supports.
Check whether you can receive the agreed stablecoin on one of those networks.
Review fees, withdrawal support, and practical availability.
Choose one network for the invoice.
Write “send only on this network.”
Request a test payment when appropriate.
Do not paste a list of five networks into the invoice and expect the client to become a blockchain operations specialist before lunch. Lower fees are useful. Correct receipt is more useful.
What should you do if the client uses the wrong token or network?
If a client sends the wrong stablecoin, uses an unintended network, or pays an incorrect address, stop before attempting another transaction. Record the network, token, amount, sender, recipient, transaction hash, and invoice. Check whether the receiving wallet controls the destination on that network. Recovery may be possible in some cases, but it must never be assumed. Follow these steps:
Save the invoice and client communication.
Record the stablecoin, network, amount, and addresses.
Save the transaction hash.
Check the transaction in the correct block explorer.
Determine whether the transfer is pending, failed, or confirmed.
Check whether your wallet controls the destination address on that network.
Do not move unexpected tokens until you understand what arrived.
Use the wallet or platform’s official recovery process when one exists.
Do not trust unsolicited support messages or recovery services.
Update your payment template to prevent the same mistake.
Confirmed blockchain transactions generally cannot be cancelled in the way a card or bank transfer sometimes can. Recovery depends on the network, destination, wallet architecture, and platform involved.
For a more detailed recovery path, read Sent Crypto on the Wrong Network? What You Can and Can’t Do.
The time to reduce this uncertainty is before the full payment moves.
What should happen after the payment arrives?
After receiving a stablecoin payment, confirm the token, network, receiving address, amount, transaction status, and transaction hash before marking the invoice as paid. Then save the payment record and send the client a receipt or confirmation. After that, follow your planned process for holding, converting, swapping, withdrawing, or spending the funds.
After receipt: Confirm that the transaction succeeded. Check that the correct stablecoin arrived. Confirm the network. Confirm the receiving address. Match the amount to the invoice. Save the transaction hash. Record the fiat value when required. Send the client a payment confirmation. Follow your planned fund-management process.
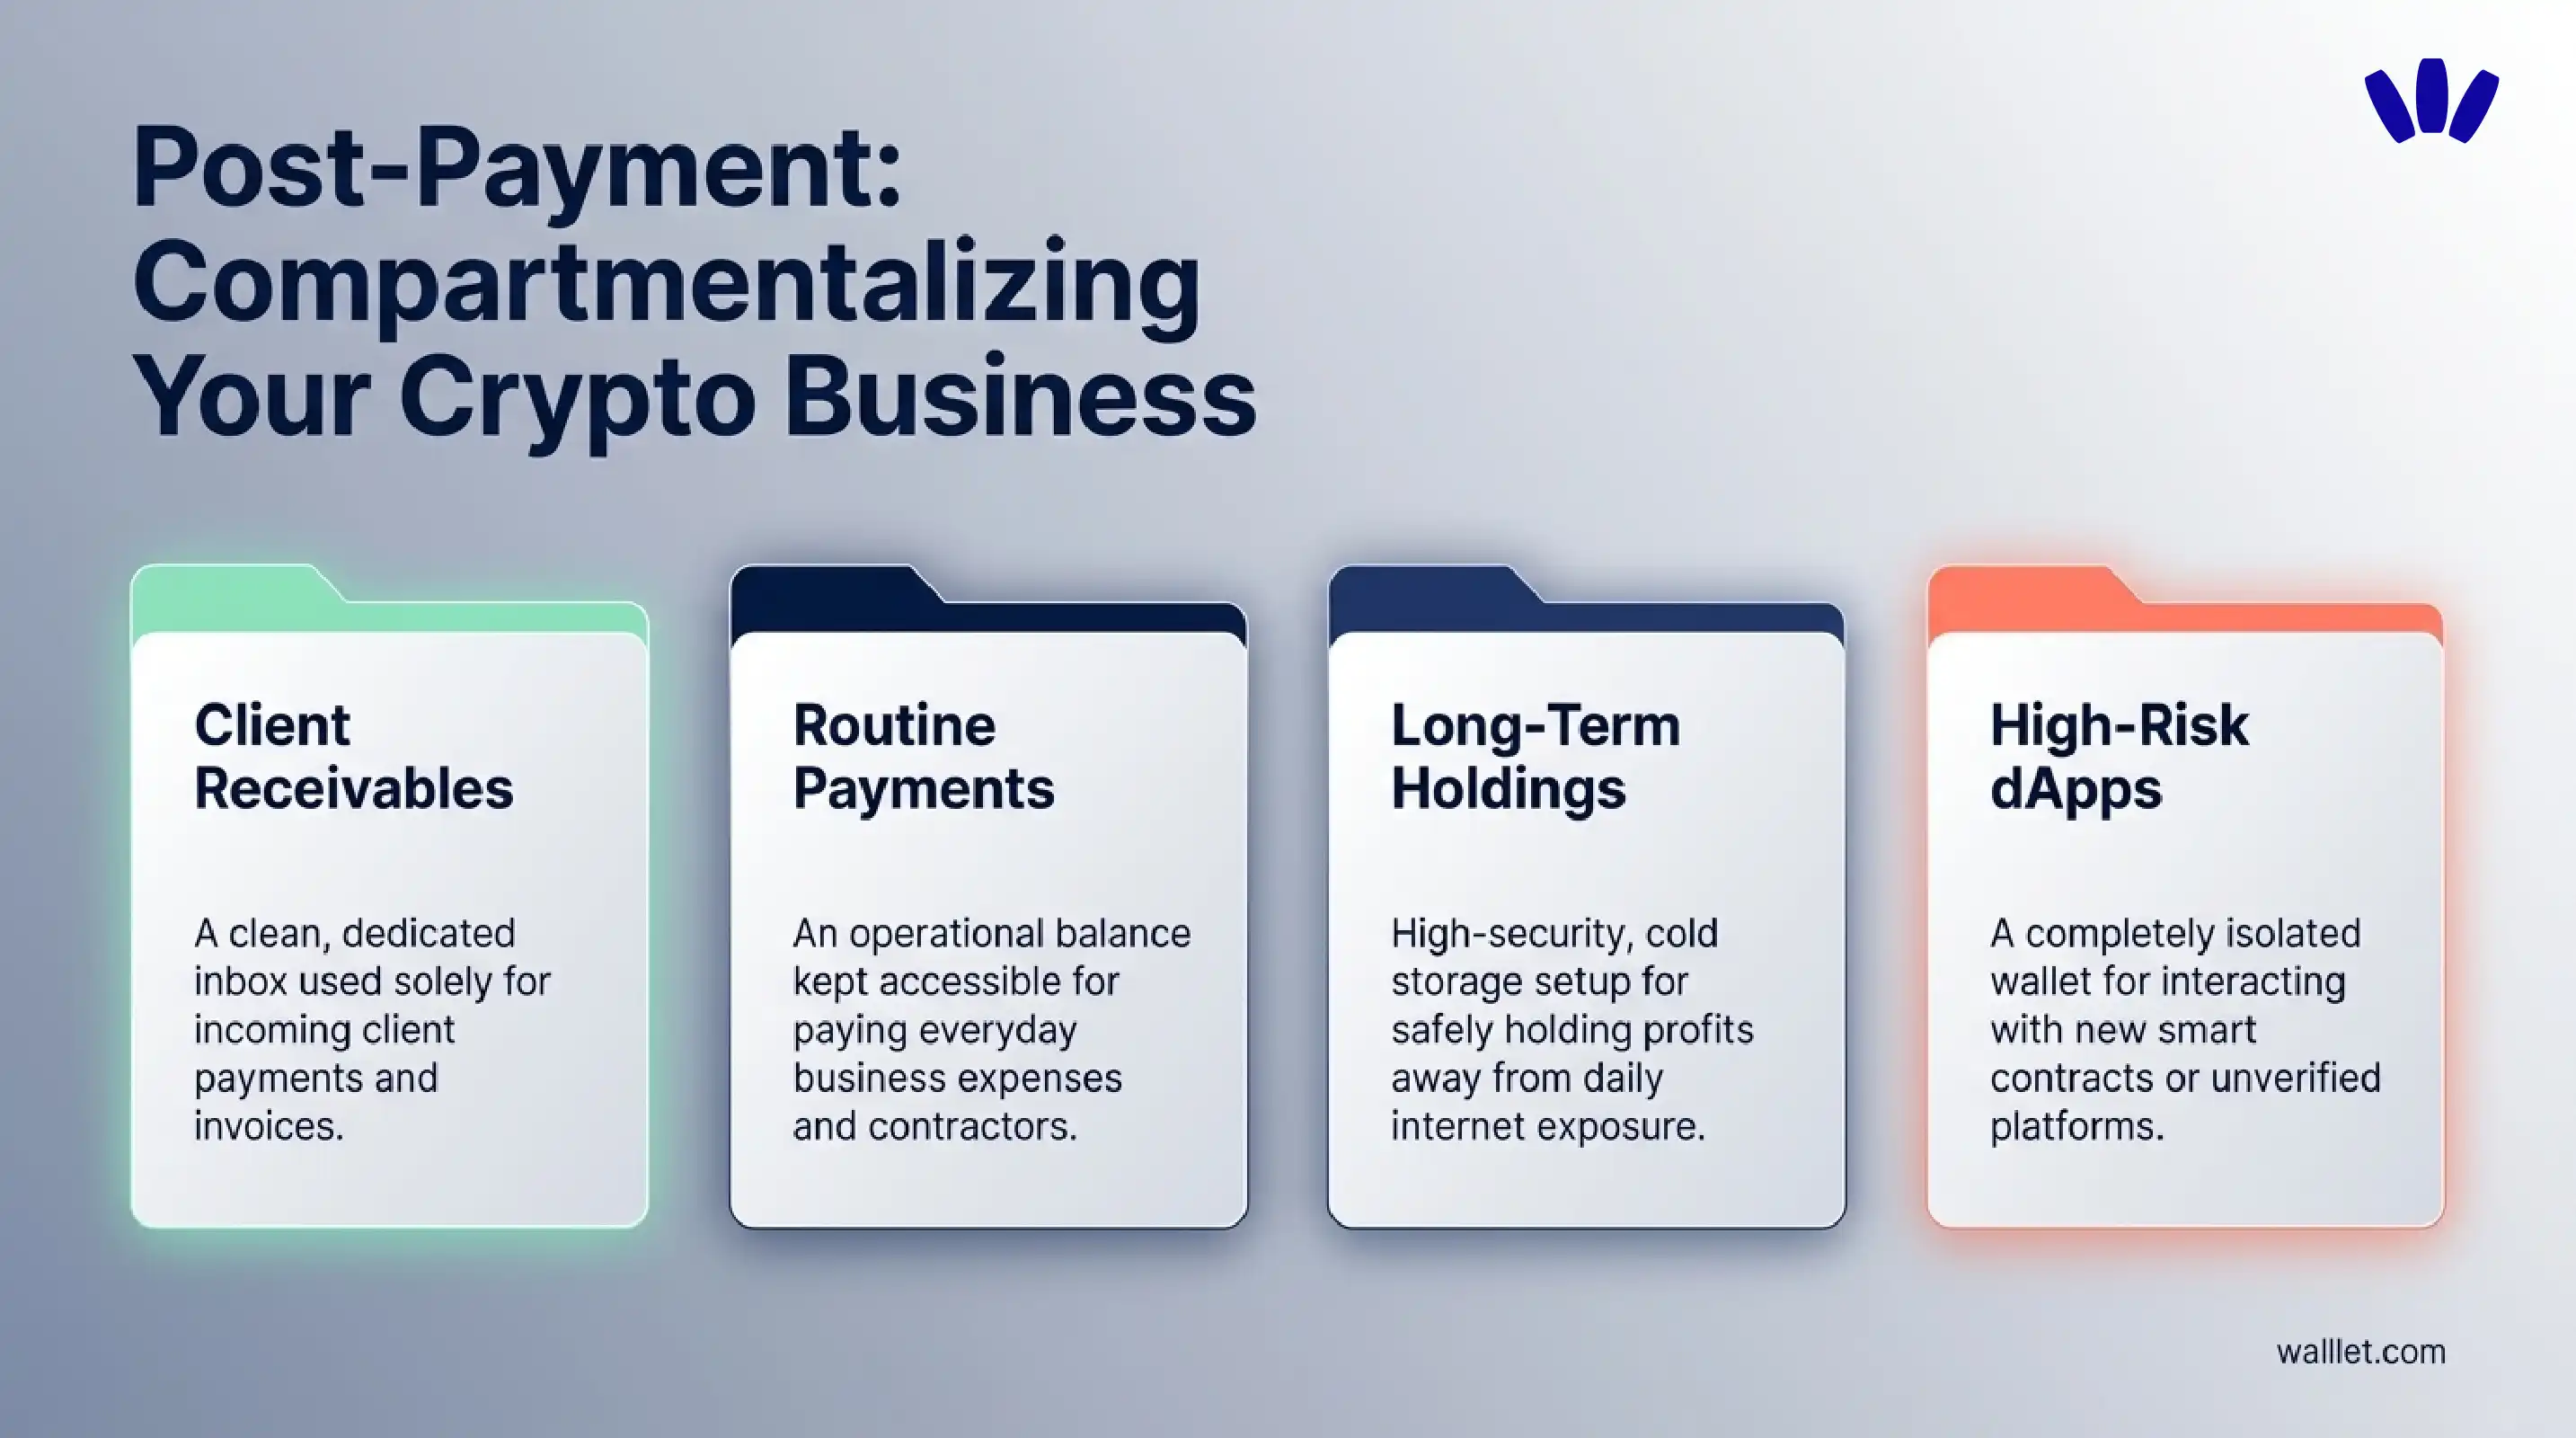
Freelancers who receive stablecoins regularly may benefit from separating funds by purpose:
One wallet or account for client receivables
One balance for routine payments
One setup for longer-term holdings
One separate wallet for higher-risk dApp activity
The purpose is not to create a maze of wallets. It is to prevent one risky activity from exposing every part of your payment workflow.
The reusable stablecoin payment checklist
Before sharing your address, verify the client, stablecoin, network, amount, current receiving address, fee responsibility, support channel, and invoice reference.
Check the address again after pasting it. Compare the full address when practical. Use a test payment for important transfers, confirm the result, and save the network and transaction hash for both the test and final payments.
Stablecoin payment verification checklist
Before sharing the address
# | Check | What to verify | Save or confirm |
1 | Payer identity | The payer matches the client, contract, or approved payment contact. | Client name or approved contact |
2 | Payment purpose | The payment is tied to a real invoice, project, or service. | Invoice number or project reference |
3 | Stablecoin | The client confirms the exact asset: USDT, USDC, or another agreed stablecoin. | Stablecoin name |
4 | Network | Both sides agree on one exact network. | Network name |
5 | Wallet support | Your receiving wallet supports that stablecoin on that network. | Wallet/account checked |
6 | Receiving address | The address is copied from the current receive screen in your wallet. | Current receiving address |
7 | Paste check | The pasted address matches the address shown inside your wallet. | Address checked after Paste |
8 | Full-address check | The full address is compared whenever practical, not only the first and last characters. | Full address verified |
9 | Network beside address | The network written in the instruction matches the wallet receive screen. | Token and network match |
10 | Invoice amount | The amount and invoice reference are included in the payment instruction. | Amount and invoice reference |
11 | What not to send | The instruction clearly says not to use another token or network. | “Send only on this network” included |
12 | Network fee | Both sides know who pays the network fee. | Fee responsibility confirmed |
13 | Support channel | The client has one verified channel for payment questions. | Verified email or contact method |
14 | Test payment | A small test payment is requested when the amount or client relationship justifies it. | Test-payment rule included |
After the test payment
# | Check | What to verify | Save or confirm |
1 | Transaction status | The test transaction is visible and confirmed on the correct network. | Test transaction status |
2 | Stablecoin received | The test payment used the agreed stablecoin. | Token checked |
3 | Network used | The test payment arrived on the agreed network. | Network checked |
4 | Receiving address | The test payment reached the intended address. | Receiving address checked |
5 | Test amount | The amount received matches the expected test amount after fees. | Test amount checked |
6 | Transaction record | The network and test transaction hash are saved. | Network + test transaction hash |
7 | Approval to continue | The client gets written approval before sending the remaining balance. | Written approval sent |
After the final payment
# | Check | What to verify | Save or confirm |
1 | Invoice match | The payment matches the correct invoice, client, and amount. | Invoice marked only after verification |
2 | Final transaction record | The final transaction hash and network are saved. | Network + final transaction hash |
3 | Bookkeeping details | The date and fiat value are recorded when needed. | Date, time, and fiat value |
4 | Client confirmation | The client receives a clear payment confirmation. | Confirmation sent |
5 | Fund handling | The funds are held, converted, swapped, or withdrawn according to your planned process. | Next action recorded |
Copy-paste moves an address. Verification checks the payment.
