The send screen shows six networks.
One costs more. One costs almost nothing. Three have similar names. The last one is apparently there to test whether you enjoy financial suspense.
Choosing the cheapest option looks sensible. Sometimes it is. Sometimes it sends your USDT or USDC to a network that the receiving wallet or exchange does not support.
The safer goal is not the lowest possible fee. It is the lowest total cost for a route that works from sender to recipient.
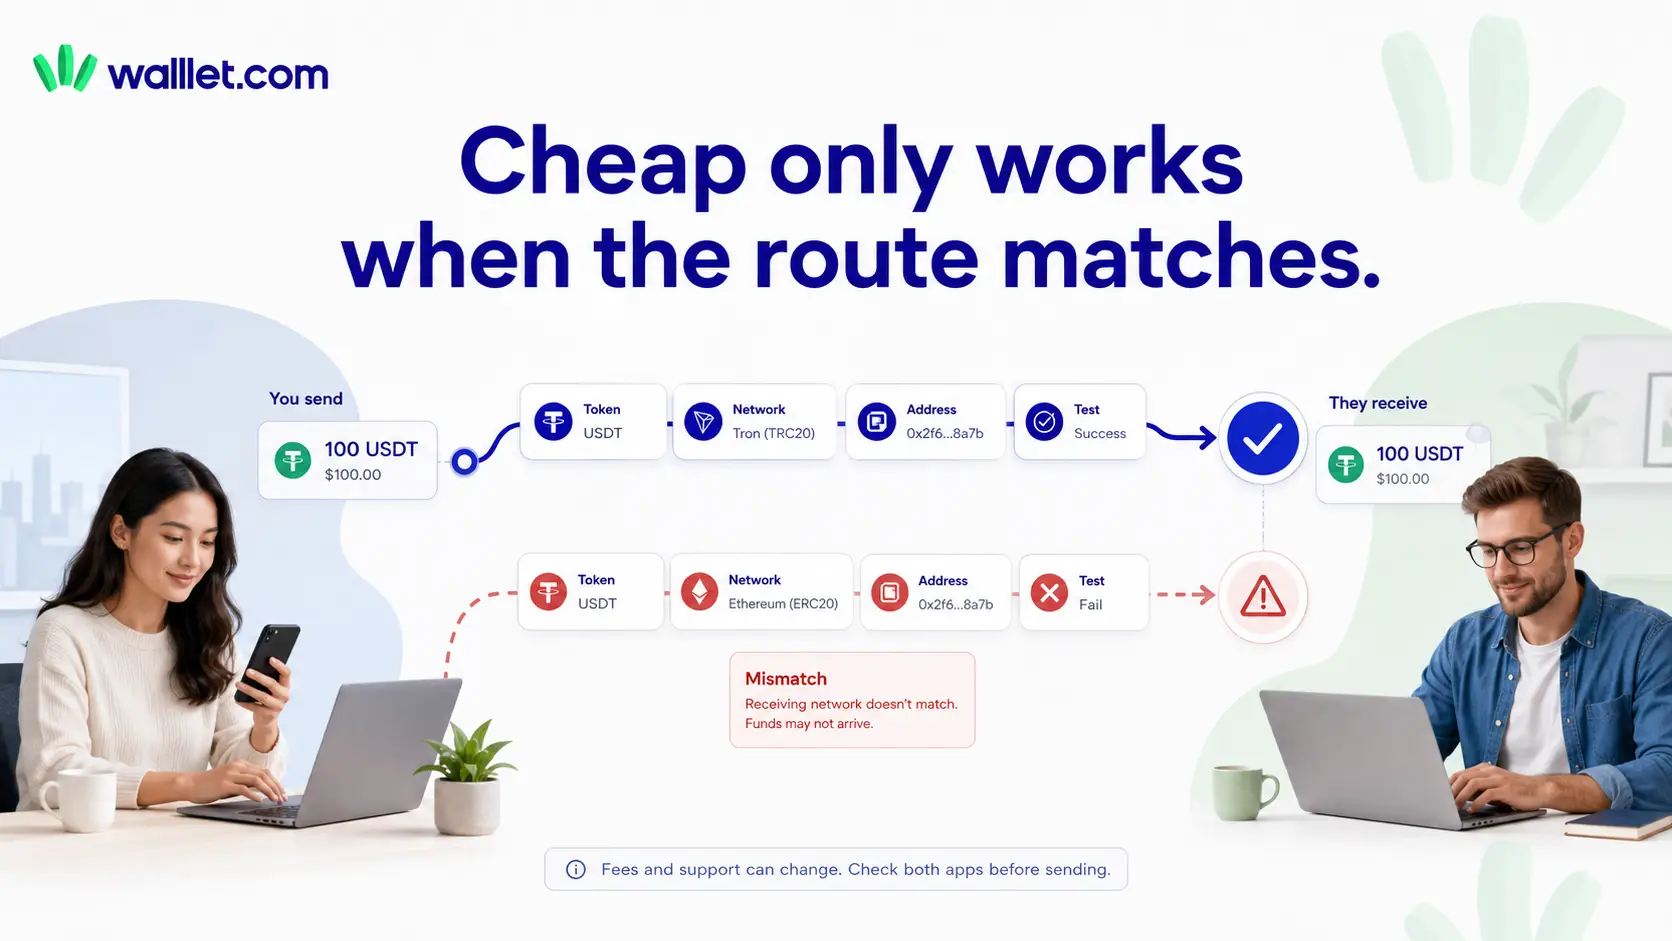
That means checking the stablecoin, network, address, exchange instructions, minimum deposit, test amount, transaction fee, and what the recipient needs to do after the funds arrive.
Quick answer: cheapest is not always safest
A low-fee network is a good choice only when all of these are true:
The sender can withdraw or send the selected stablecoin on that network.
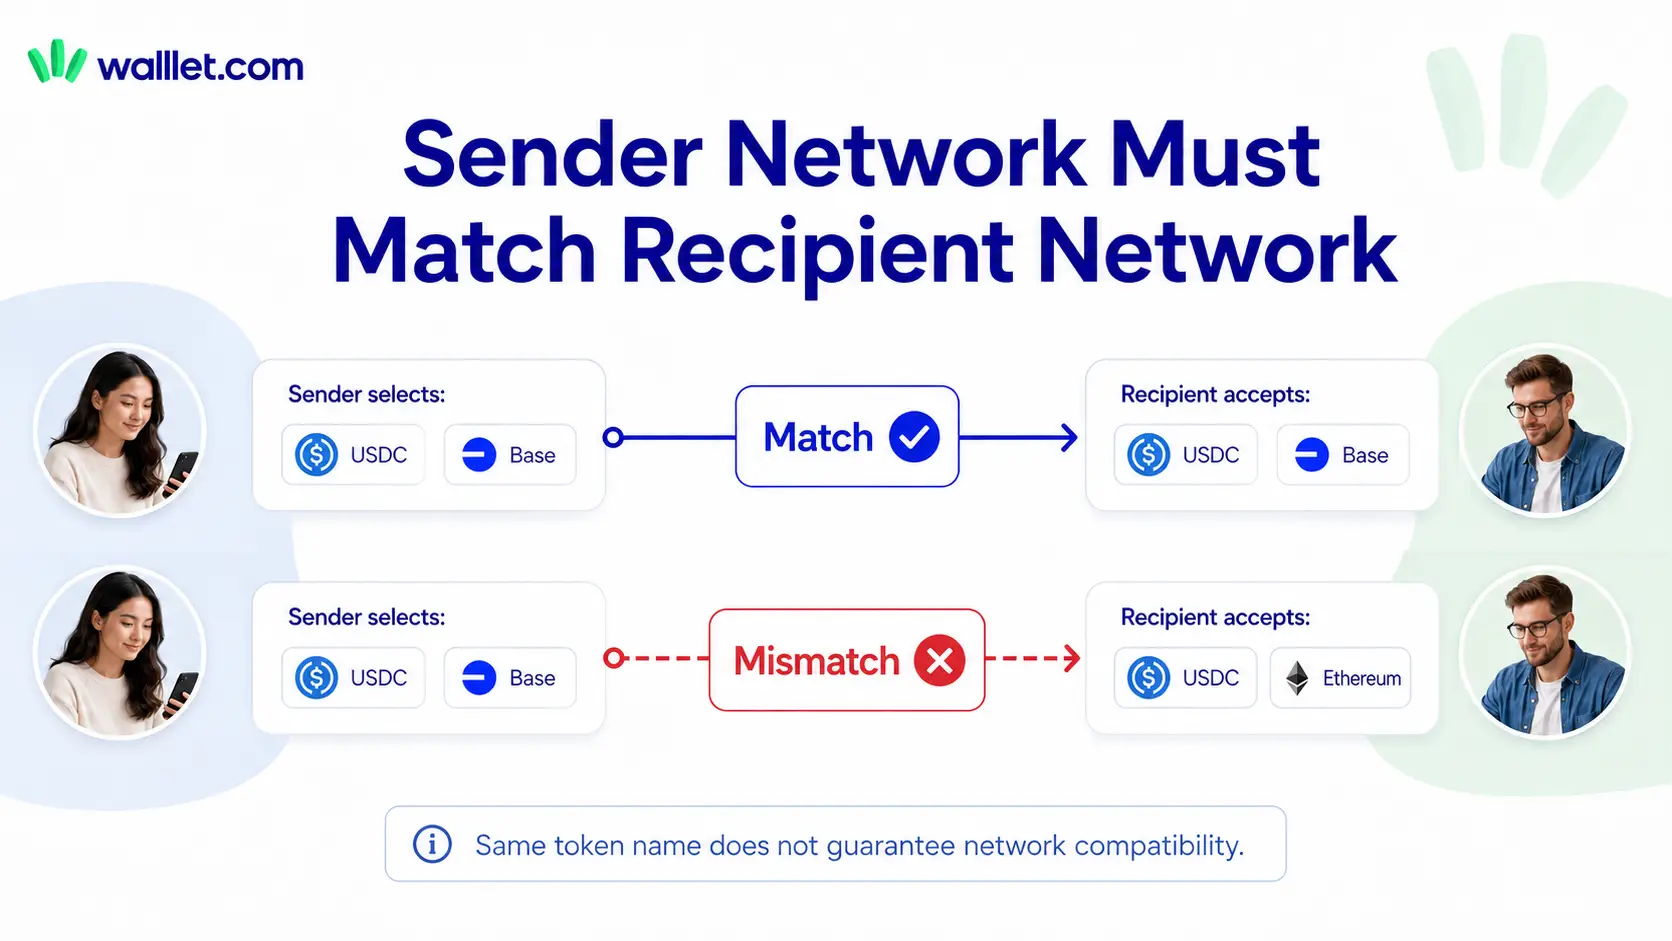
The recipient can receive the same stablecoin on the same network.
The receiving address came from the correct wallet or exchange deposit screen.
The destination accepts the exact token version being sent.
Any deposit minimum or additional instruction has been checked.
A test transfer has arrived successfully when the route is new or the amount is meaningful.
The stablecoin ticker is not enough.
“USDT” is incomplete. “USDT on Tron” is a transfer instruction.
“USDC” is incomplete. “Native USDC on Base” is a transfer instruction.
For a deeper comparison of which networks fit different stablecoin routes, read the guide to choosing the best network for USDT or USDC.
Common USDT and USDC networks at a glance
Fees and platform support change. Treat the table as a decision framework, not a live fee quote. Check the actual fee and supported network inside the sending and receiving apps before every transfer.
Network | Common stablecoin use | Typical fee pattern | Main risk | Check before sending |
Ethereum | USDT and USDC where broad mainnet support is needed | Often higher and more variable | Paying more than expected or choosing mainnet unnecessarily | Recipient explicitly accepts ERC-20 on Ethereum |
Tron | Common USDT payment and exchange route | Often lower than Ethereum, although exchange withdrawal fees may dominate | Treating TRC-20 USDT as interchangeable with ERC-20 USDT | Recipient explicitly accepts USDT on Tron |
Base | Common low-cost route for native USDC | Usually lower than Ethereum mainnet | Exchange or wallet does not support Base deposits | Recipient accepts native USDC on Base |
Arbitrum | Common low-cost route for native USDC and EVM apps | Usually lower than Ethereum mainnet | Native USDC and bridged token versions may be treated differently | Exact token contract and deposit network match |
Polygon PoS | Low-cost USDC transfers where supported | Usually low | Native and bridged token confusion | Recipient supports the exact USDC version |
Solana | Low-cost USDT or USDC transfers where supported | Usually low | Destination does not support the Solana token standard | Recipient accepts the token on Solana |
Tether’s official protocol list shows that USDT exists across several networks, including Ethereum, Tron, and Solana. Circle separately lists native USDC support across networks including Ethereum, Base, Arbitrum, Polygon PoS, and Solana. A token existing on a blockchain does not mean every wallet or exchange accepts deposits through that blockchain.
What affects the cost of sending USDT or USDC?
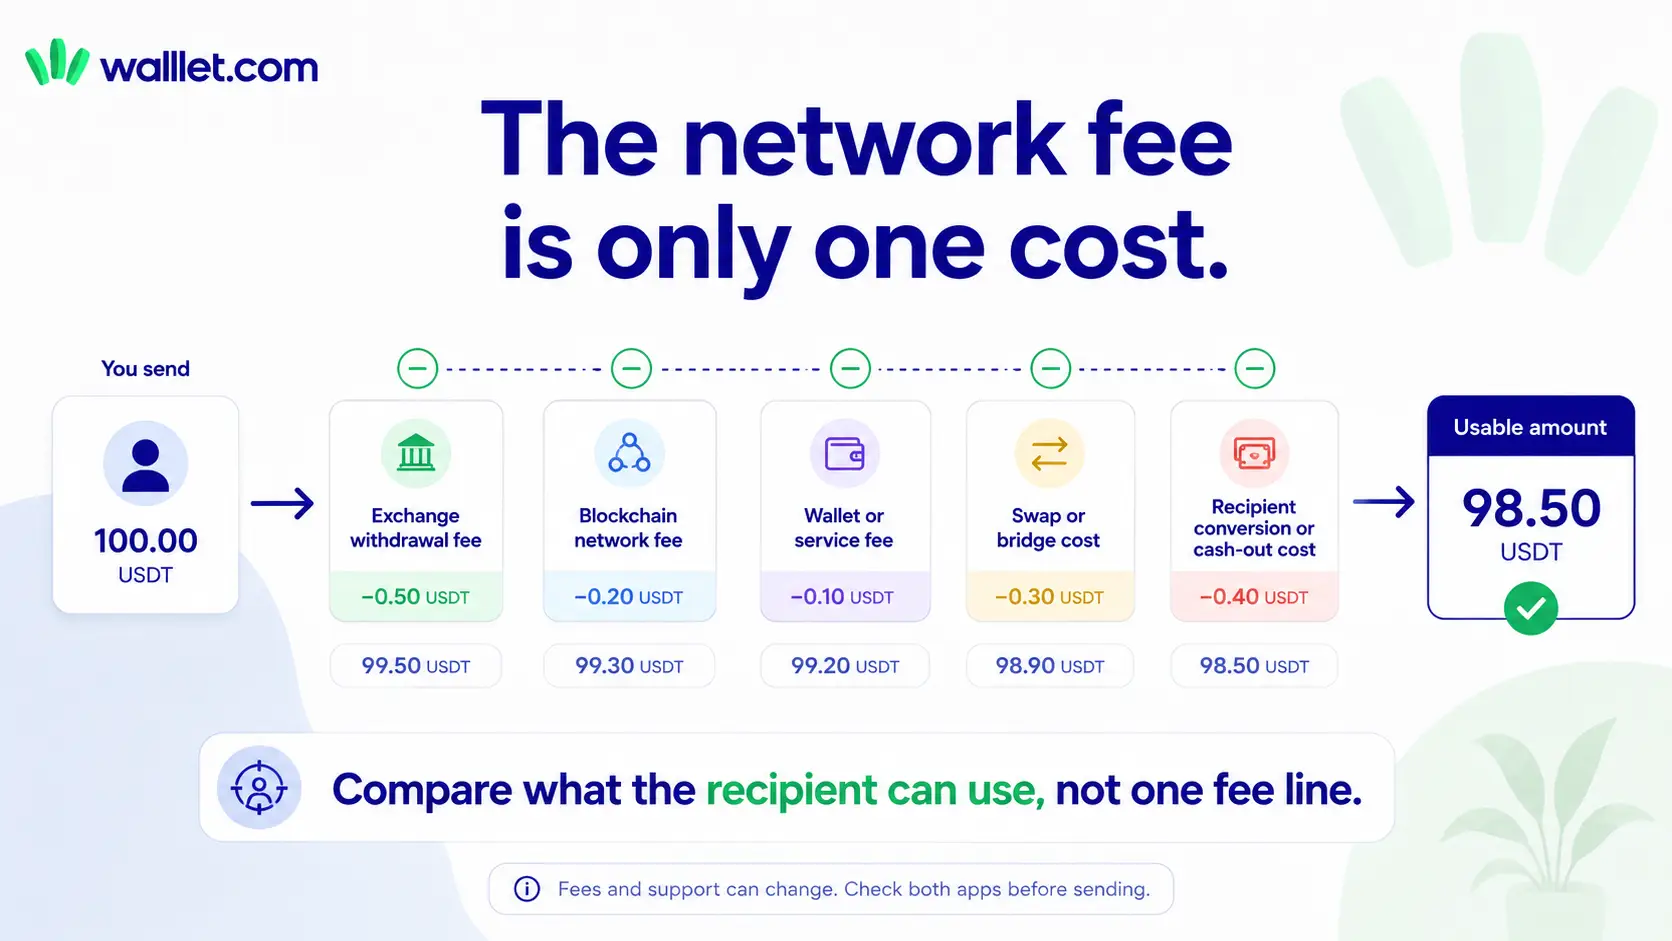
The visible network fee is only one part of the cost. A more useful calculation is:
Total route cost = withdrawal fee + network fee + wallet or service fee + swap or bridge cost + recipient conversion or cash-out cost
Network fee
A blockchain transfer needs network resources. On Ethereum and EVM networks, this is usually described as gas. Other chains use their own fee models. The fee can change with congestion, transaction complexity, and the network’s current conditions.
Exchange withdrawal fee
An exchange may charge a fixed withdrawal fee for each token and network. This fee can be much larger than the underlying blockchain fee. That is why a network known for cheap transfers may still look expensive on an exchange withdrawal screen. Always compare the amount the recipient will receive, not just a general online estimate of the network fee.
Wallet or service fee
Some wallets, payment apps, or routing providers may add a service fee. Others may sponsor part of the network cost on supported flows. Review the confirmation screen. Do not assume that “network fee” is the only deduction.
Swap or bridge cost
You may save money on the first transfer and then spend more moving the asset to the network you actually need. For example, receiving USDC cheaply on one network does not help much if the recipient must immediately bridge it, swap it, or send it to another exchange. If the funds are already on the wrong chain for their next use, read the practical swap and bridge guide before adding another route and another opportunity for human creativity.
Recipient conversion or cash-out cost
For cross-border payments, the final cost may include converting USDT or USDC, moving it to another wallet, withdrawing through an exchange, or turning it into local currency. The cheapest transfer should be measured from the sender’s balance to money the recipient can actually use.
Why USDT and USDC network support matters
USDT and USDC are both designed to track the US dollar, but they are separate tokens issued by separate companies. They also exist on multiple blockchains. Circle’s documentation warns users not to send unsupported tokens or bridged USDC to deposit addresses intended for native USDC. Tether asks platforms to make their supported protocols explicit. Those warnings exist because a familiar ticker can hide a different token contract and network route.
Before sending, identify four things:
The token: USDT or USDC.
The network: Ethereum, Tron, Base, Arbitrum, Polygon, Solana, or another supported chain.
The token version: native, bridged, or another representation.
The destination’s support: whether the wallet, exchange, or payment app accepts that exact combination.
Anyone can copy a token name and ticker. When there is doubt, verify the contract using the issuer’s official documentation or a trusted block explorer. For the issuer, reserve, freeze, and token differences behind these stablecoins, start with Stablecoins 101: USDC vs USDT vs DAI.
The safe transfer checklist before sending USDT or USDC
Use this checklist every time the address, recipient, network, exchange, or sending app changes.
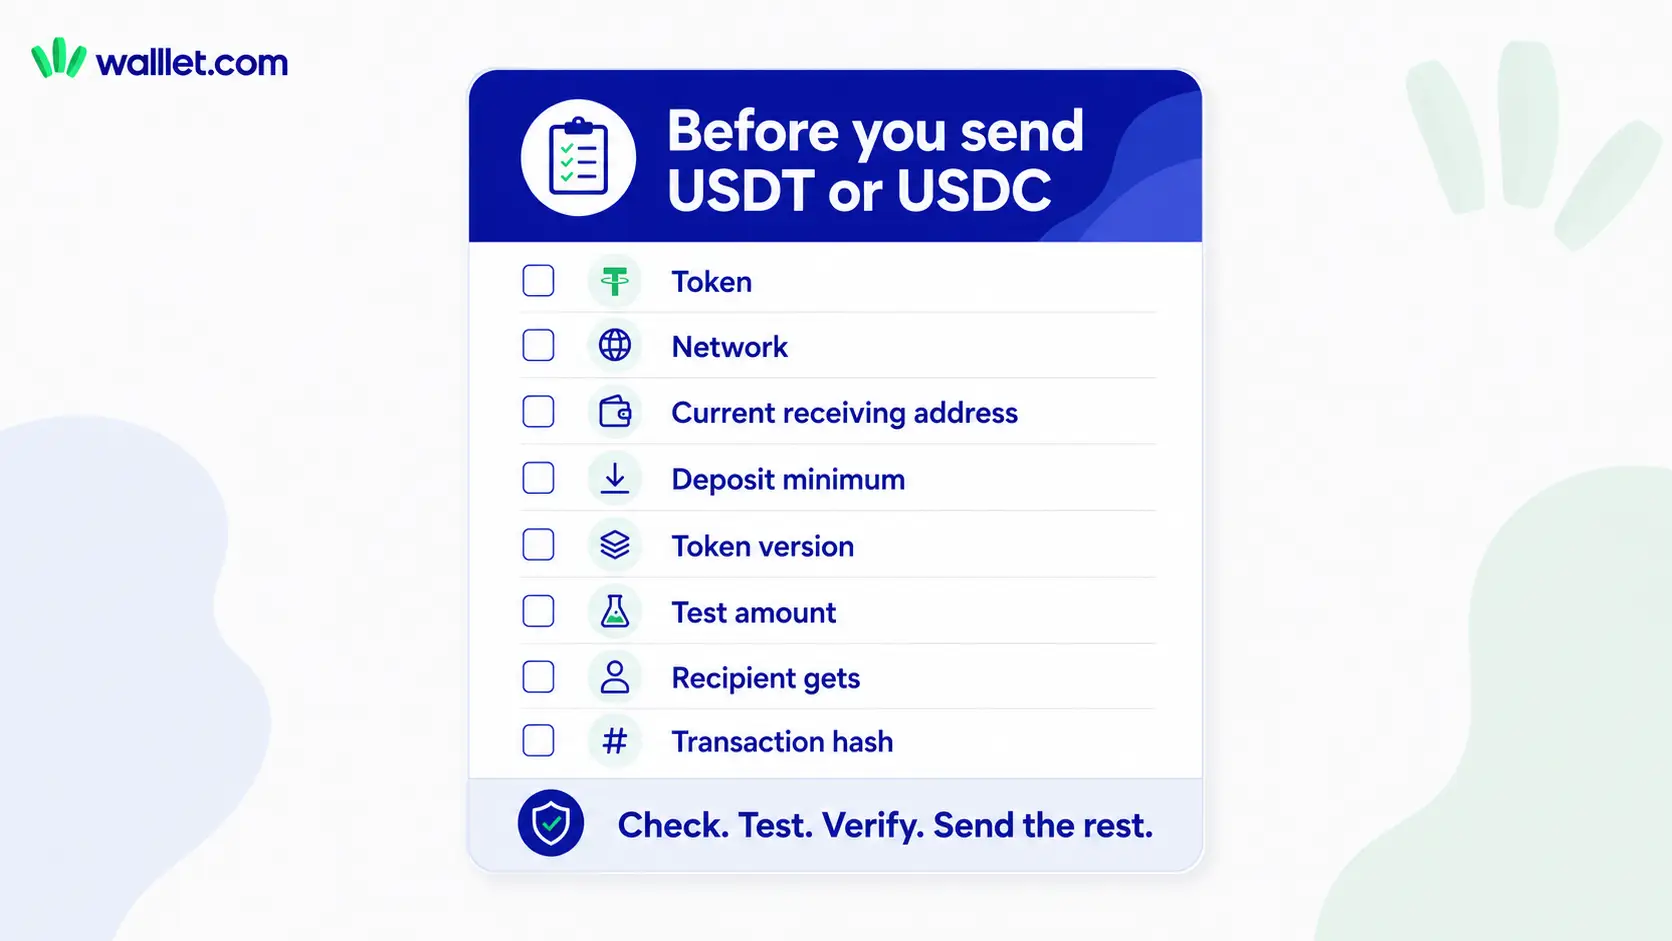
1. Confirm the token
Ask whether the recipient wants USDT or USDC. Do not treat them as interchangeable because they are both dollar-linked tokens.
2. Confirm the exact network
The sender and recipient must use the same network. Examples:
USDT on Tron to USDT on Tron
USDT on Ethereum to USDT on Ethereum
USDC on Base to USDC on Base
USDC on Solana to USDC on Solana
A normal wallet transfer does not automatically move the asset between networks.
3. Copy the address from the current receiving screen
Do not use an address from an old chat, screenshot, invoice, or saved note unless the recipient has confirmed it is still correct. For exchange deposits, generate or copy the address after selecting the token and network.
4. Compare the address
Check the first and last characters. For a meaningful transfer, compare more than four characters at each end. Clipboard malware and address-poisoning scams can replace or imitate addresses. Copying is still safer than typing, but copying is not a magical ceremony that prevents all bad outcomes.
5. Read the deposit instructions
For an exchange deposit, check:
Supported network
Exact token
Minimum deposit
Required confirmations
Token contract or version
Whether a memo, tag, or reference is displayed
Whether deposits are temporarily paused
Binance tells users to match the deposit and withdrawal networks rather than choosing the cheapest fee. Kraken also warns that deposits below the stated minimum may not be credited and notes that some networks support more than one USDC version. If the deposit screen shows a memo, tag, or reference, copy it exactly. Do not add one because another transaction used it, and do not omit one because the address looks familiar.
6. Review the amount the recipient gets
The sender may pay the network fee separately, or the platform may deduct a withdrawal fee from the amount. If an invoice requires exactly 500 USDT, make sure the recipient is not going to receive 496 USDT after deductions.
7. Send a test transfer
Use a test when:
The recipient is new.
The address is new.
The network is new to either side.
The sending exchange has changed.
The amount is meaningful.
The destination is an exchange or custodial platform.
The token has native and bridged versions.
The test must use the same token, network, address, and sending route as the final transfer.
8. Save the transaction hash
The transaction hash is the best record of what happened onchain. Save it with the token, network, amount, recipient, invoice, and date. A screenshot can help, but the hash is what lets you verify the transaction independently. For payment work, this becomes especially important. The complete freelancer workflow is covered in How to Get Paid in USDT or USDC as a Freelancer.
Want to test this process in a self-custodial wallet before using it for a larger payment? Create a walllet and start with a small stablecoin transfer. Check the currently supported token and network inside the app before sending.
How to send a small USDT or USDC test transfer
A test transfer is a small payment sent before the full amount to confirm that the route works. It costs an extra fee. It also costs much less than discovering that a four-figure payment went to an unsupported exchange deposit.
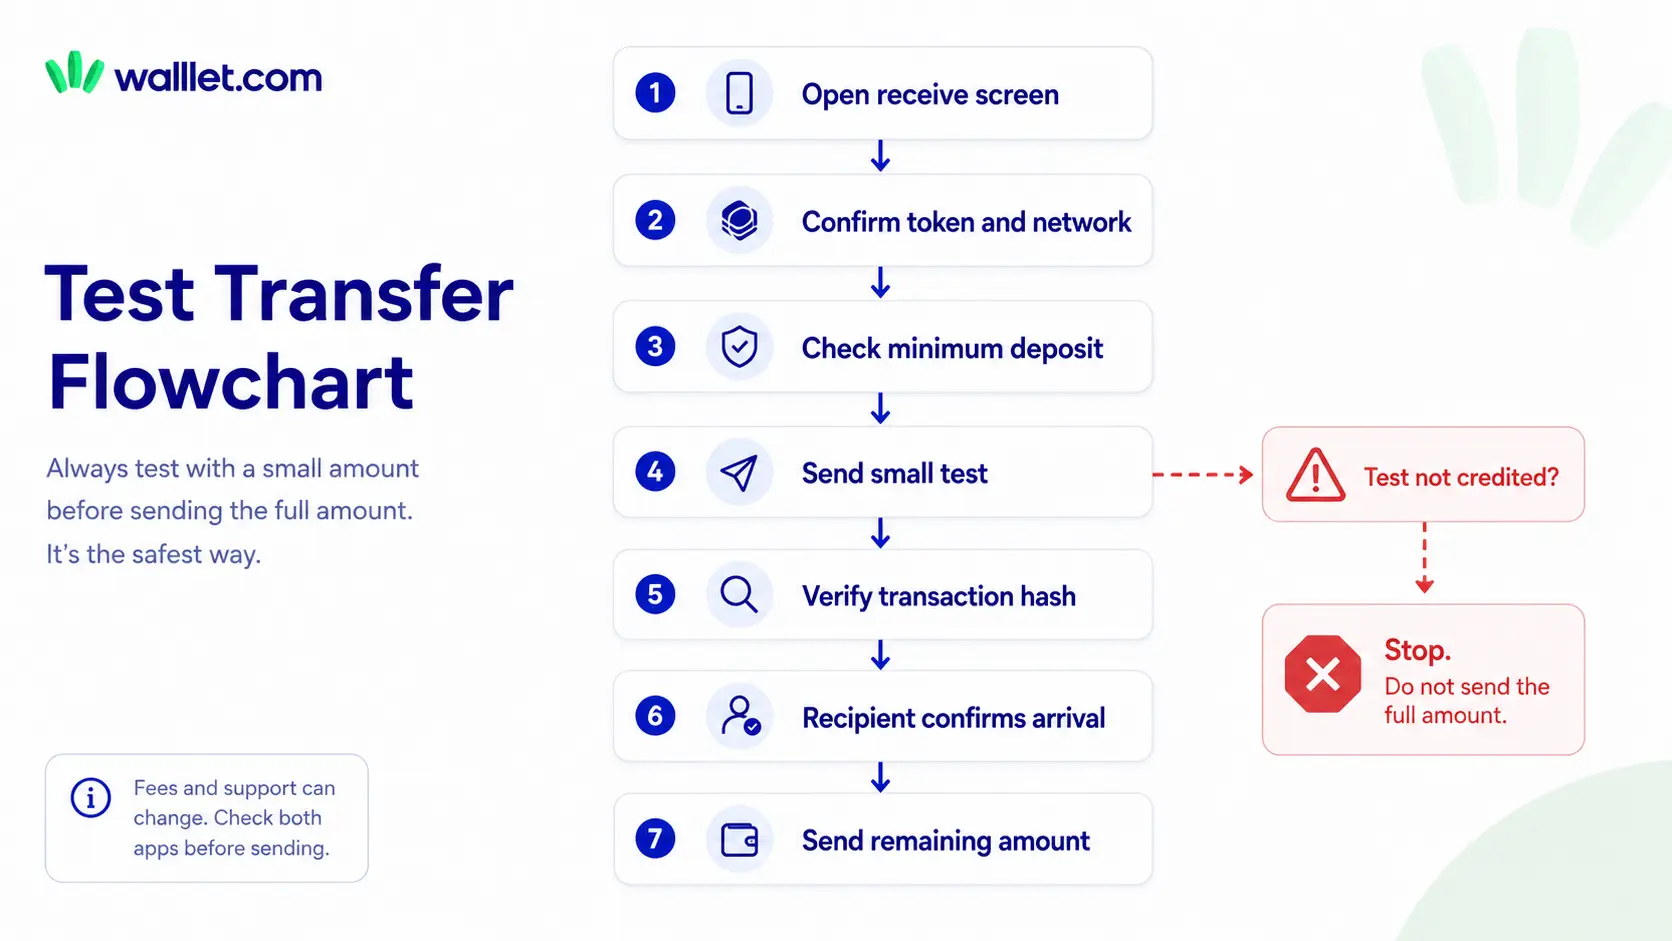
Step 1: Open the recipient’s current receive screen
The recipient should select the exact stablecoin and network. If the recipient is using an exchange, they should open the deposit page rather than copying an address from transaction history.
Step 2: Confirm the instruction in writing
Use a clear message:
Please confirm that this address accepts USDC on Base. I will send a small test first and send the remaining amount after you confirm receipt.
This gives both sides one last chance to catch a mismatch.
Step 3: Check the test amount against the deposit minimum
A tiny test can fail if the exchange requires a larger minimum deposit. The test amount should be small relative to the full transfer but large enough to meet the destination’s current minimum after fees.
Step 4: Send the test using the final route
Do not test from one wallet and send the final payment from a different exchange unless you verify the second route separately. Different sending platforms may support different token contracts, networks, and withdrawal methods.
Step 5: Verify the transaction
After sending, check:
Transaction status
Network
Token
Amount
Receiving address
Token transfer event
Confirmations
Use the block explorer transaction guide if the explorer page looks like it was designed by engineers who believe whitespace is morally suspicious.
Step 6: Wait for the recipient to confirm credit
A successful blockchain transaction does not always mean an exchange has credited the user’s account. Wait until the recipient sees the deposit in the actual destination account.
Step 7: Send the remaining amount
Reopen the address and compare it again before sending the balance. Do not blindly reuse the recent-address suggestion. Address poisoning attacks depend on that exact habit.
What is the cheapest way to send USDT?
There is no single cheapest USDT route for every sender and recipient. A practical USDT decision usually follows this order:
List the networks available on the sender’s withdrawal screen.
Remove every network the recipient does not support.
Compare the actual withdrawal fee for the remaining options.
Check whether the recipient can use or cash out USDT on that network.
Avoid any route that requires an immediate bridge or extra transfer.
Test the selected route.
USDT on Tron is commonly used for routine transfers when both sides support TRC-20. Ethereum may make more sense when the destination specifically requires ERC-20. Solana can offer a lower-cost route where both platforms support USDT on Solana.
If an app offers USDT on another network, verify the token contract and deposit support. Do not assume that seeing “USDT” in both apps means the route matches.
The cheapest usable route wins. A two-dollar saving is irrelevant if the recipient then needs a ten-dollar bridge or a support ticket written in the desperate prose of someone who has just discovered irreversible transactions.
What is the cheapest way to send USDC?
For USDC, lower-cost networks such as Base, Arbitrum, Polygon PoS, and Solana may offer cheaper transfers than Ethereum mainnet when both sides support native USDC. The important word is native.
Some exchanges and wallets distinguish between native USDC and bridged versions such as USDC.e. The ticker may look similar while the token contract and deposit treatment differ. Use this process:
Open the recipient’s USDC deposit or receive screen.
Note the exact network and token version.
Check the sender supports that same route.
Compare the displayed withdrawal and network fees.
Confirm what the recipient will do with the USDC after arrival.
Send a test transfer.
If the recipient only accepts USDC on Ethereum, sending USDC on Base or Polygon is not a cheap alternative. It is a different transfer.
Wallet-to-wallet vs exchange transfers
The safest checks change depending on who controls the destination.
Transfer type | Main risk | What to verify | Best safety habit |
Self-custody wallet to self-custody wallet | Wrong address, network, or token contract | Recipient controls the address and wallet supports the network | Send a test and verify onchain |
Exchange to self-custody wallet | Wrong withdrawal network or fixed exchange fee | Wallet supports the exact token and network | Compare the amount received before confirming |
Self-custody wallet to exchange | Unsupported network, minimum deposit, or token version | Current deposit page and all displayed instructions | Generate a fresh deposit instruction |
Exchange to exchange | Different network menus and withdrawal policies | Both platforms list the same route | Do not select by fee alone |
Cross-chain transfer | Bridge, routing, contract, or token-version risk | Final token, destination network, minimum received, and provider | Avoid cross-chain movement unless it solves a real route problem |
Self-custody gives you control of the receiving address. It does not remove the need to check the network. An exchange may be able to help with an incorrect deposit, but recovery can be slow, costly, or unavailable. A support form is not a substitute for a five-minute test transfer, despite humanity’s recurring interest in learning things after the expensive part.
What happens if you choose the wrong network?
A wrong-network transfer can lead to several different outcomes.
The funds arrived at an address you control on another EVM network
If the destination is your own self-custody address and the networks are EVM-compatible, the same account may control the address on both chains. The funds may be accessible after switching to the correct network and adding the correct token. Do not move anything until you confirm the transaction and token contract.
The funds were sent to an exchange on an unsupported network
The transaction may be successful onchain while the exchange fails to credit it. Contact the exchange with:
Transaction hash
Stablecoin
Network
Token contract
Amount
Deposit address
Date and time
Screenshot of the explorer result
Recovery is not guaranteed.
The funds went to the wrong address
This is not a network mismatch. It is an address error. Blockchain transfers generally cannot be reversed. Recovery depends on whether the owner of the receiving address is known and willing to return the funds. For a full recovery decision tree, use Sent Crypto on the Wrong Network? What You Can and Can’t Recover.
Why did my USDT or USDC transfer complete but not arrive?
Start with the transaction hash.
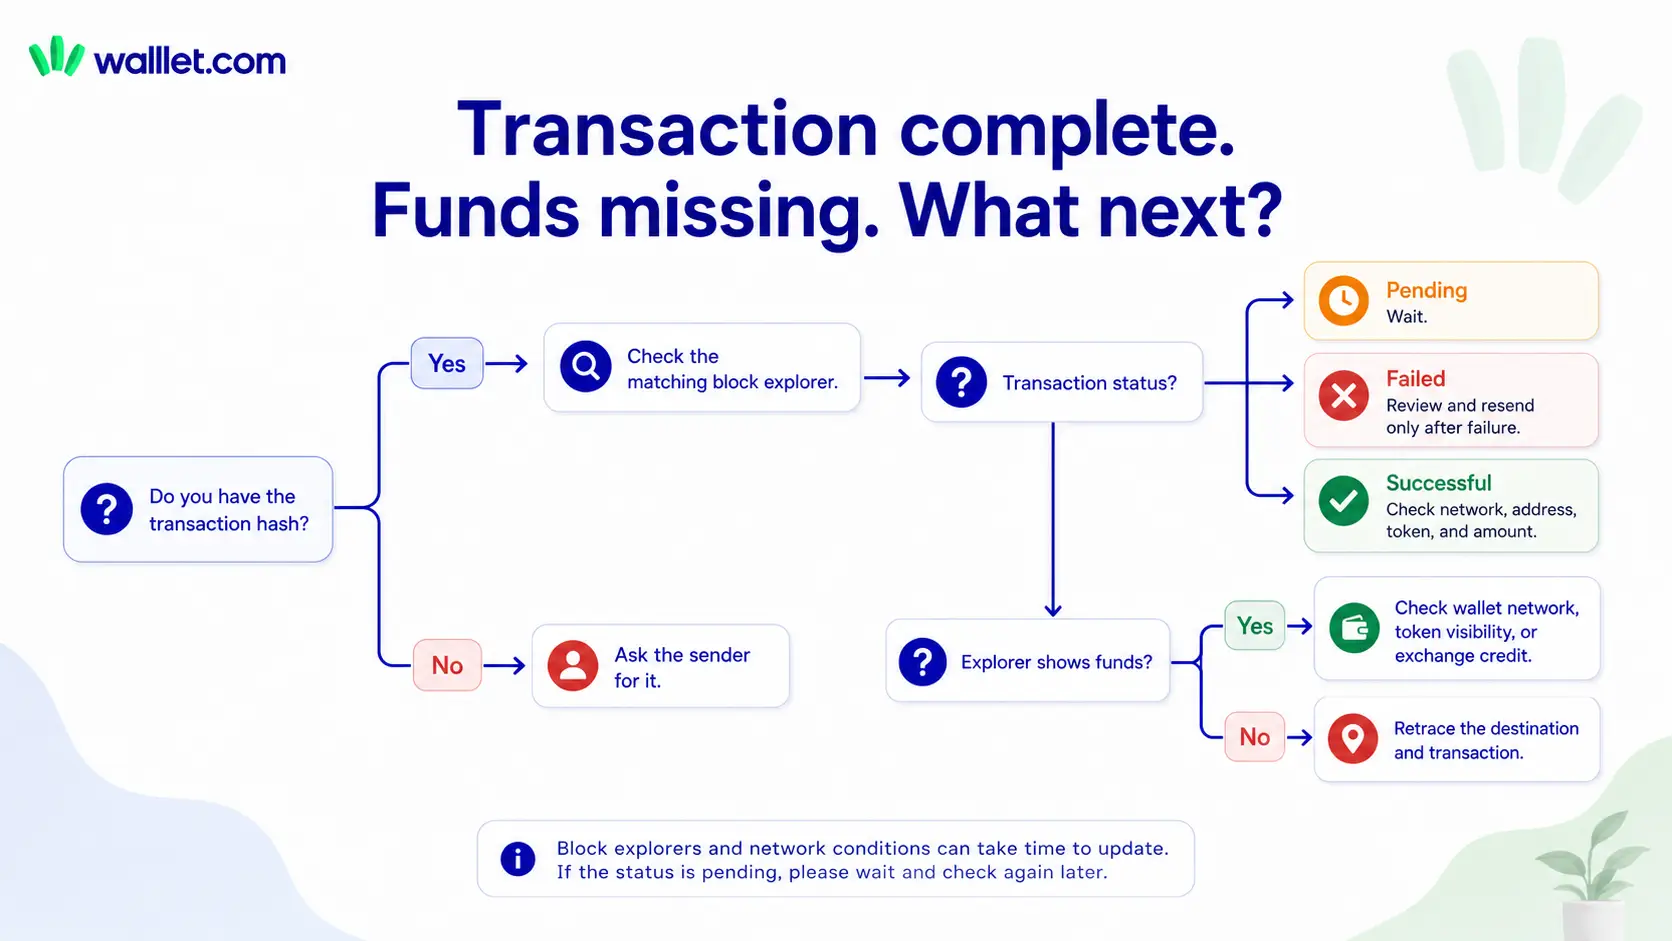
If the transaction is pending
Wait for the network to confirm it. Do not send a duplicate transfer until the first transaction has either succeeded or failed.
If the transaction failed
The stablecoin usually remains in the sender’s wallet, although the network fee may still have been spent. Review the error before trying again.
If the transaction succeeded on the wrong network
Open the recipient address on the explorer for the network that was actually used. The token may be present but invisible in the recipient’s current wallet view.
If the transaction succeeded on the correct network
Check:
Recipient address
Token contract
Amount
Confirmations
Exchange deposit minimum
Deposit status or maintenance notice
Native versus bridged token version
Whether the exchange has credited the deposit internally
If the explorer shows the token but the wallet shows zero
The wallet may be displaying the wrong network, hiding the token, using another account, or failing to load the balance. Follow the wallet balance troubleshooting guide before assuming the asset has disappeared.
If the recipient only has a screenshot
Ask for the transaction hash. A send confirmation screenshot shows what an app claims happened. The transaction hash lets you check what the blockchain recorded.
What should a safer wallet show before you send?
A wallet cannot make an incorrect address correct. It cannot force an exchange to support a network. It cannot reverse a blockchain transaction after confirmation. It can reduce ambiguity before you approve the transfer.
A practical stablecoin wallet should make these details easy to inspect:
Stablecoin name
Network
Recipient address
Amount
Estimated fee
Amount the recipient should receive
Transaction status
Transaction hash
Current supported networks and assets
walllet.com is a self-custodial wallet built around passkeys and biometric access rather than asking users to manage a traditional seed phrase during setup. It also focuses on readable transaction prompts. That can reduce access and approval friction, but you still need to verify the destination and supported route before sending. The useful workflow is deliberately boring:
Confirm the route.
Copy from the live receive screen.
Test it.
Verify the hash.
Send the rest.
Boring is underrated when the alternative is explaining to support that you selected a network because it was twenty cents cheaper.
Before using stablecoins for a client payment or a larger transfer, create your walllet and test the route with a small amount. Verify the supported token and network inside the current app before moving the full balance.
