
You have crypto on Binance, a wallet address ready, and a network menu that suddenly makes the whole transfer feel less simple.
To move crypto from Binance to a passkey wallet, create the wallet first, copy the receive address for the exact asset and network, then withdraw from Binance using that same network. Send a small test amount, confirm it on-chain, and move the rest only after the test arrives. Do not import a seed phrase unless you are deliberately migrating an existing Binance Wallet.
Moving crypto from Binance to a passkey wallet is not just a withdrawal. It is a custody decision. You are moving funds from an exchange account into a wallet where you control the destination, the network choice, and the responsibility that comes with it. If you are still deciding whether an exchange or wallet is the right place for your funds, read Self-Custody vs Exchange for Everyday Crypto Use before moving a large amount.
A passkey wallet can make that move feel less intimidating, especially if you do not want the old seed phrase experience. If the term is new to you, start with What Is a Passkey Wallet?. The short version: it helps make wallet access feel more like a modern app, while still keeping the self-custody model.
TL;DR
A Binance passkey and a passkey wallet are not the same thing. A Binance passkey helps protect your Binance account. A passkey wallet helps you access a self-custodial crypto wallet.
If your crypto is in your Binance exchange account, you usually want an on-chain withdrawal, not a wallet import.
The most important rule is simple: match the asset, receiving address, and network before sending. The cheapest network is not always the right one.
Send a small test transfer first, especially if this is your first time using that wallet, asset, or network.
Are you withdrawing from Binance or migrating Binance Wallet?
Before doing anything, check which Binance product you are actually using.
This sounds boring. It is not. A lot of confusion starts because “Binance” can mean your exchange account, Binance Wallet, Binance Web3 Wallet, or a Binance account passkey. Those are different things.
What you have | What it means | What you should usually do |
Crypto in a Binance exchange account | Your assets are held inside your Binance account | Withdraw on-chain to your passkey wallet address |
Crypto already inside Binance Wallet | Your assets are in a wallet product connected to Binance | Decide whether to send funds out or migrate the wallet |
A Binance passkey | A security method for verifying Binance account actions | Use it for Binance security, not as a self-custody wallet |
A passkey wallet | A self-custodial wallet accessed with passkeys or biometrics | Use it as the receiving wallet if it supports your asset and network |
If your crypto is sitting in your Binance exchange account, you usually withdraw it to your new wallet address. Binance’s official withdrawal guide describes an on-chain withdrawal flow where users choose an asset, paste a withdrawal address, select the network, check the details, and complete verification through security checks like passkey or 2FA. Binance also warns users to choose the same network as the receiving platform, because choosing the wrong network can lead to lost funds.
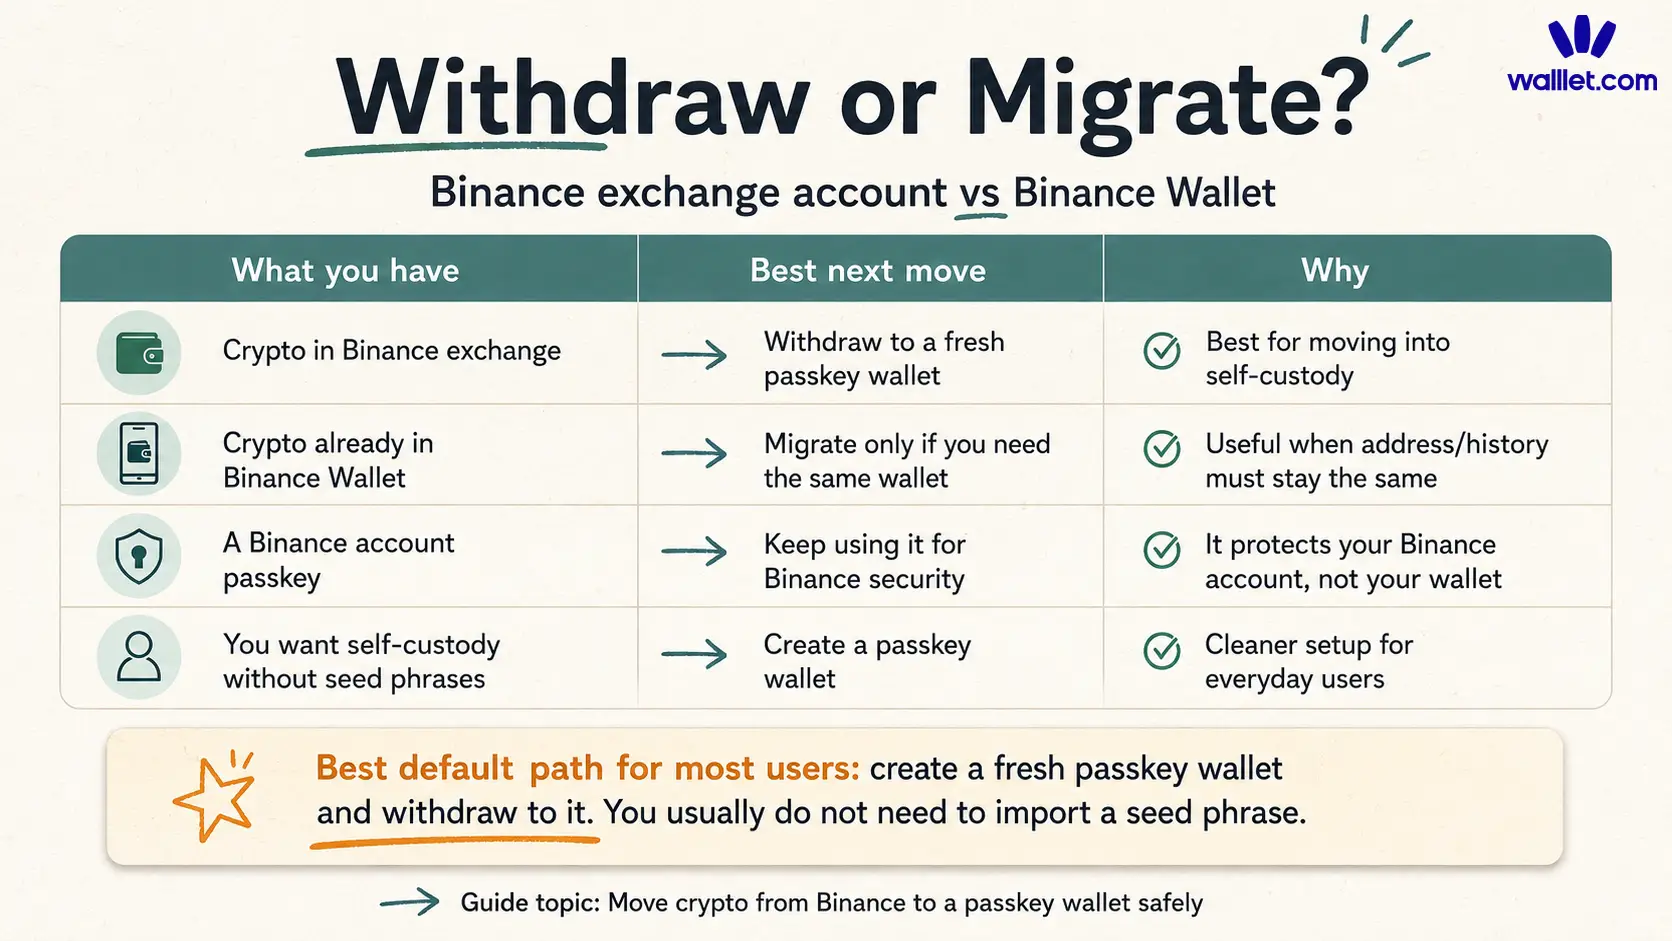
If your crypto is already inside Binance Wallet and you want to keep the same wallet address, that is a different situation. Some migration flows involve seed phrase handling. For most everyday users moving funds out of a Binance exchange account, a fresh passkey wallet plus a normal on-chain withdrawal is cleaner. You do not need to expose an existing seed phrase just to receive crypto in a new wallet.
Is a Binance passkey the same as a passkey wallet?
No. A Binance passkey helps protect actions inside your Binance account. A passkey wallet helps you access and use a wallet you control.
A passkey is a cryptographic credential that lets you approve access with the same kind of method you already use to unlock your device, such as Face ID, fingerprint, PIN, or device password. The FIDO Alliance describes passkeys as passwordless credentials designed to reduce phishing risk because there are no reusable passwords to steal. FIDO Alliance passkeys Here is the difference in normal language:
Term | What it protects | What it does not mean |
Binance passkey | Your Binance login or account verification flow | It does not automatically move your crypto into self-custody |
Passkey wallet | Access to a self-custodial wallet | It does not remove the need to check address and network |
Seedless passkey wallet | Wallet access without the usual seed phrase experience | It does not make transfers consequence-free |
That changes who you are trusting, and what you are responsible for.
What should you check before withdrawing crypto from Binance?
Before you tap Withdraw, check the asset, network, address, memo or tag, and test amount.
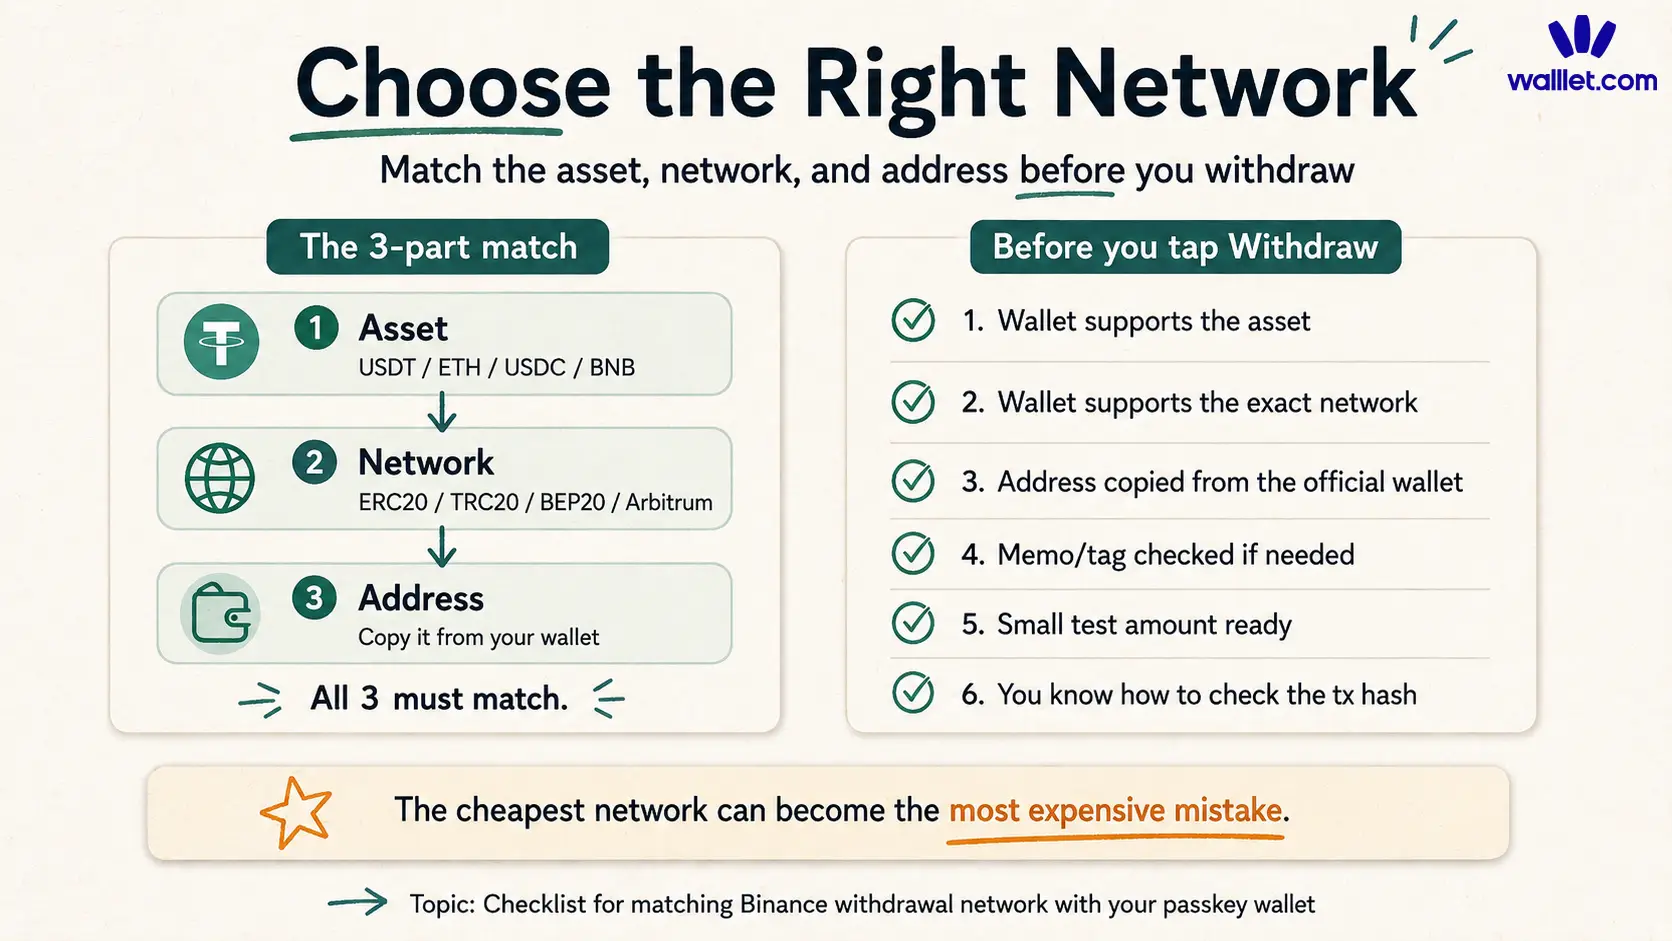
The asset and network check is the most important one. USDT on Ethereum, USDT on Tron, USDT on BNB Smart Chain, and USDT on Arbitrum are not the same route. A wallet may support one and not another. If you want a deeper explanation of this specific problem, read Best Network to Send USDC or USDT.
Do not treat the network field like a fee menu. It is the route your crypto takes to reach the wallet. Choose the route your wallet supports first, then decide whether the fee is acceptable. A simple pre-withdrawal check:
Check | Why it matters |
Asset | The wallet must support the token you want to receive |
Network | Binance and your wallet must use the same network |
Address | The receive address must come from the official wallet app or site |
Memo or tag | Some assets require extra information |
Test amount | A small transfer confirms the route before you move more |
Recovery path | You should understand how you regain access if your device changes |
If you are using walllet.com, also check the current supported networks before sending. The article walllet.com Supported Chains is the right internal reference for that.
How to move crypto from Binance to a passkey wallet
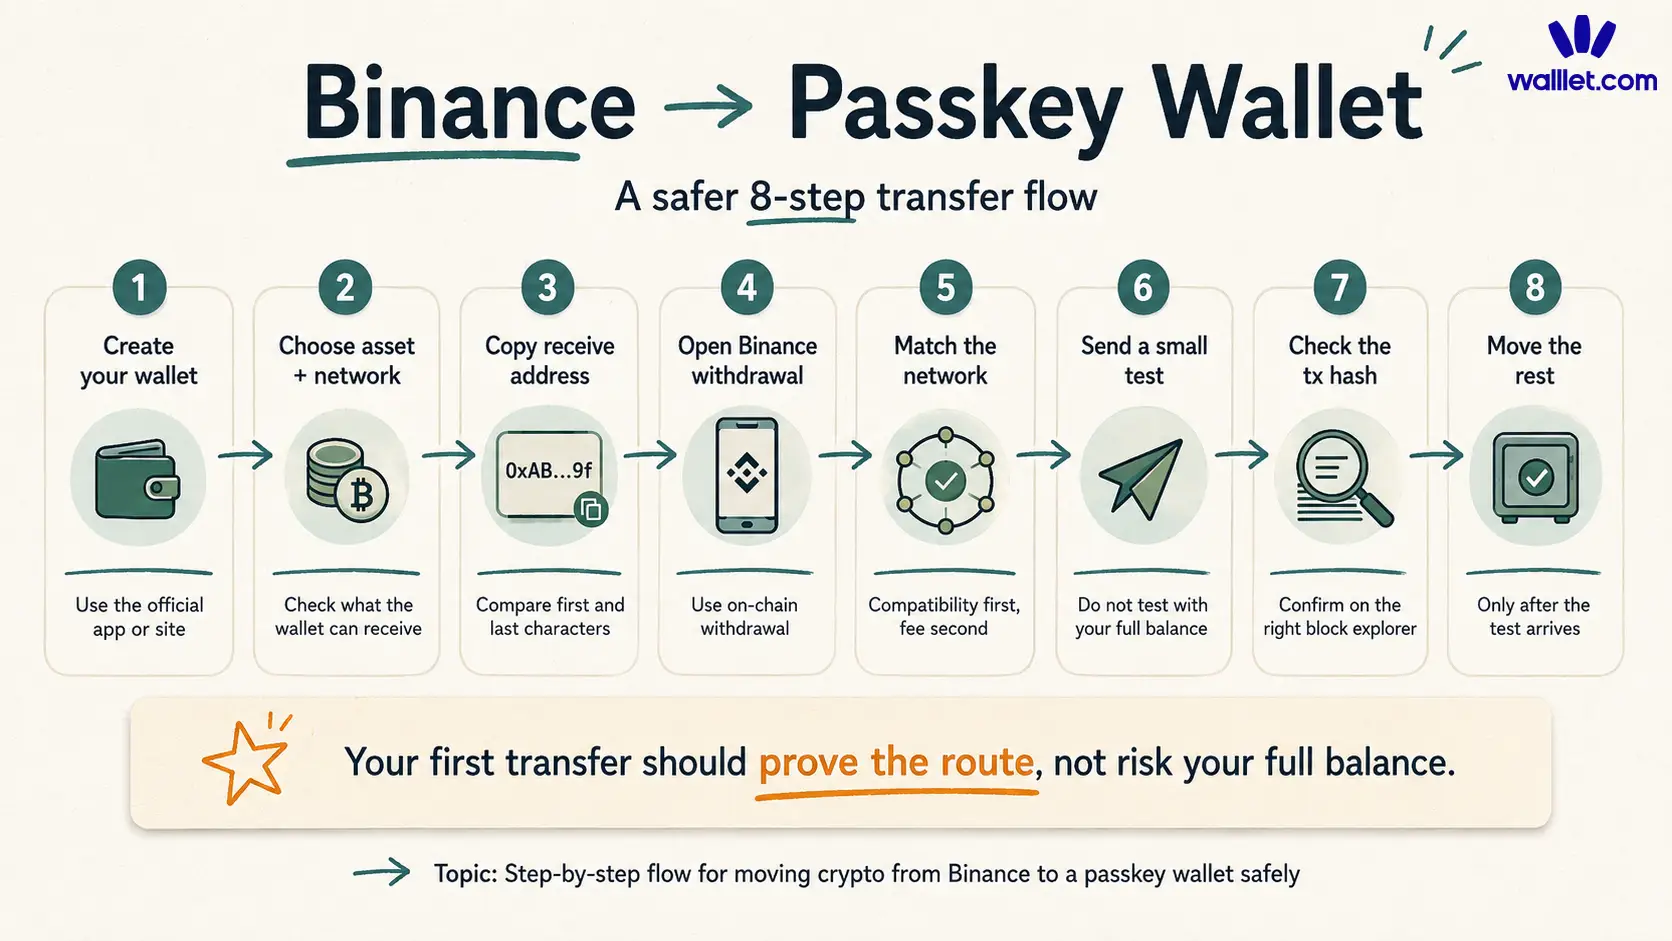
The safest flow is not difficult. It is just careful.
Step 1: Create or open your passkey wallet
Set up your passkey wallet before opening Binance. Use the official app or website. Do not install a wallet from a random search ad, Telegram message, or “support agent” link. This is especially important before moving funds from an exchange, because the receive address must come from the real wallet.
If you are worried about the recovery side of seedless wallets, read Are Seedless Wallets Safe? before moving a large amount. Seedless does not mean risk-free. It means the wallet replaces the seed phrase with another recovery and access model, which you should understand.
Step 2: Choose the asset and network in your wallet
Open the receive flow for the asset you want to move. Do not only look for “USDT,” “ETH,” or “BNB.” Look for the network too. Your wallet must support the same network you will choose on Binance. A good receive screen should make this clear. If it does not, stop and check before sending.
Step 3: Copy the receive address
Copy the full address from your wallet. After pasting it into Binance, compare the first few and last few characters. This protects you from clipboard problems, address poisoning habits, and plain human sloppiness.
Never type a long wallet address manually. If you want to understand why an address is not the same thing as your wallet, read Web3 Account vs Wallet Address vs Private Key.
Step 4: Open Binance and choose crypto withdrawal
In Binance, choose the asset you want to withdraw and select an on-chain withdrawal to an external wallet address.
The exact wording may change by region, app version, or account setup. The important point is that you are making an on-chain withdrawal to your passkey wallet address, not an internal Binance transfer.
Step 5: Paste the address and select the matching network
This is the highest-risk moment. Paste the receive address. Then select the network that matches your passkey wallet’s receive network.
Compatibility first. Fee second.
The cheapest network can become the most expensive mistake.
Step 6: Send a small test amount first
If this is your first time moving this asset to this wallet on this network, send a small test transfer. Yes, this may mean paying the withdrawal or network fee twice. That is annoying. It is still better than using your full balance as the test transaction.
A test transfer confirms that the address was copied correctly, the network is compatible, and the wallet can detect or display the asset.
Step 7: Confirm the transaction on-chain
After Binance submits the withdrawal, open your Binance withdrawal history and find the transaction hash. A transaction hash is the tracking number for an on-chain transaction. Use the block explorer for the network you chose. For example, Ethereum uses Etherscan, BNB Smart Chain uses BscScan, Polygon uses Polygonscan, and Arbitrum uses Arbiscan.
If the transaction succeeded on-chain and the destination address is correct, the funds have arrived on-chain even if your wallet interface has not shown them yet.
Step 8: Move the rest only after the test arrives
Once the test transfer arrives correctly, repeat the same process with the larger amount. Use the same asset, same network, and same verified wallet address. Do not switch networks halfway through because another option looks cheaper.
A good transfer should feel almost boring. No panic. No recovery quest. No stranger in your DMs offering to “sync your wallet.”
Can walllet.com receive crypto from Binance?
Yes, if walllet.com supports the asset and network you choose on Binance. This is the important part: Binance support and wallet support must overlap. If Binance lets you withdraw USDT on one network, but your wallet receive screen supports USDT on another network, that is not a match.
walllet.com is useful for this kind of move because it is built for people who want self-custody without the usual seed phrase setup. You create a wallet with passkey-based access, then receive crypto into a wallet you control. But walllet.com does not make network checks disappear. The safe flow is still: confirm support, copy the receive address, send a small test amount, verify it, then move more. A good way to think about it:
Question | What you need to confirm |
Can I send this asset from Binance? | Binance shows the asset as withdrawable |
Can walllet.com receive it? | walllet.com supports that asset and network |
Should I move all of it? | Not before a small test transfer arrives |
Do I need a seed phrase? | Not for normal receiving into a fresh walllet.com wallet |
What can go wrong during a Binance withdrawal?
Most transfer mistakes are small mismatches. They feel small before the transaction. They do not feel small afterward.
Wrong network
This is the classic mistake. The asset leaves Binance on a network your receiving wallet does not support or cannot display. Sometimes recovery may be possible. Sometimes it is technical, slow, expensive, or not possible at all. You should not build your transfer plan around recovery.
Wrong address
If you paste the wrong wallet address and confirm the withdrawal, you may not be able to reverse it. That is why checking the first and last characters after pasting matters. It feels tiny. It is not tiny.
Missing memo or tag
Some assets and platforms require an extra memo, tag, or payment ID. Most normal self-custody wallet transfers do not require a memo, but you should never assume. Check the receive screen.
Unsupported token contract
A wallet may support a network but not automatically display every token on that network. This can feel like the funds disappeared. In some cases, the funds are on-chain, but the wallet needs the right network selected or the token displayed.
Fake support messages
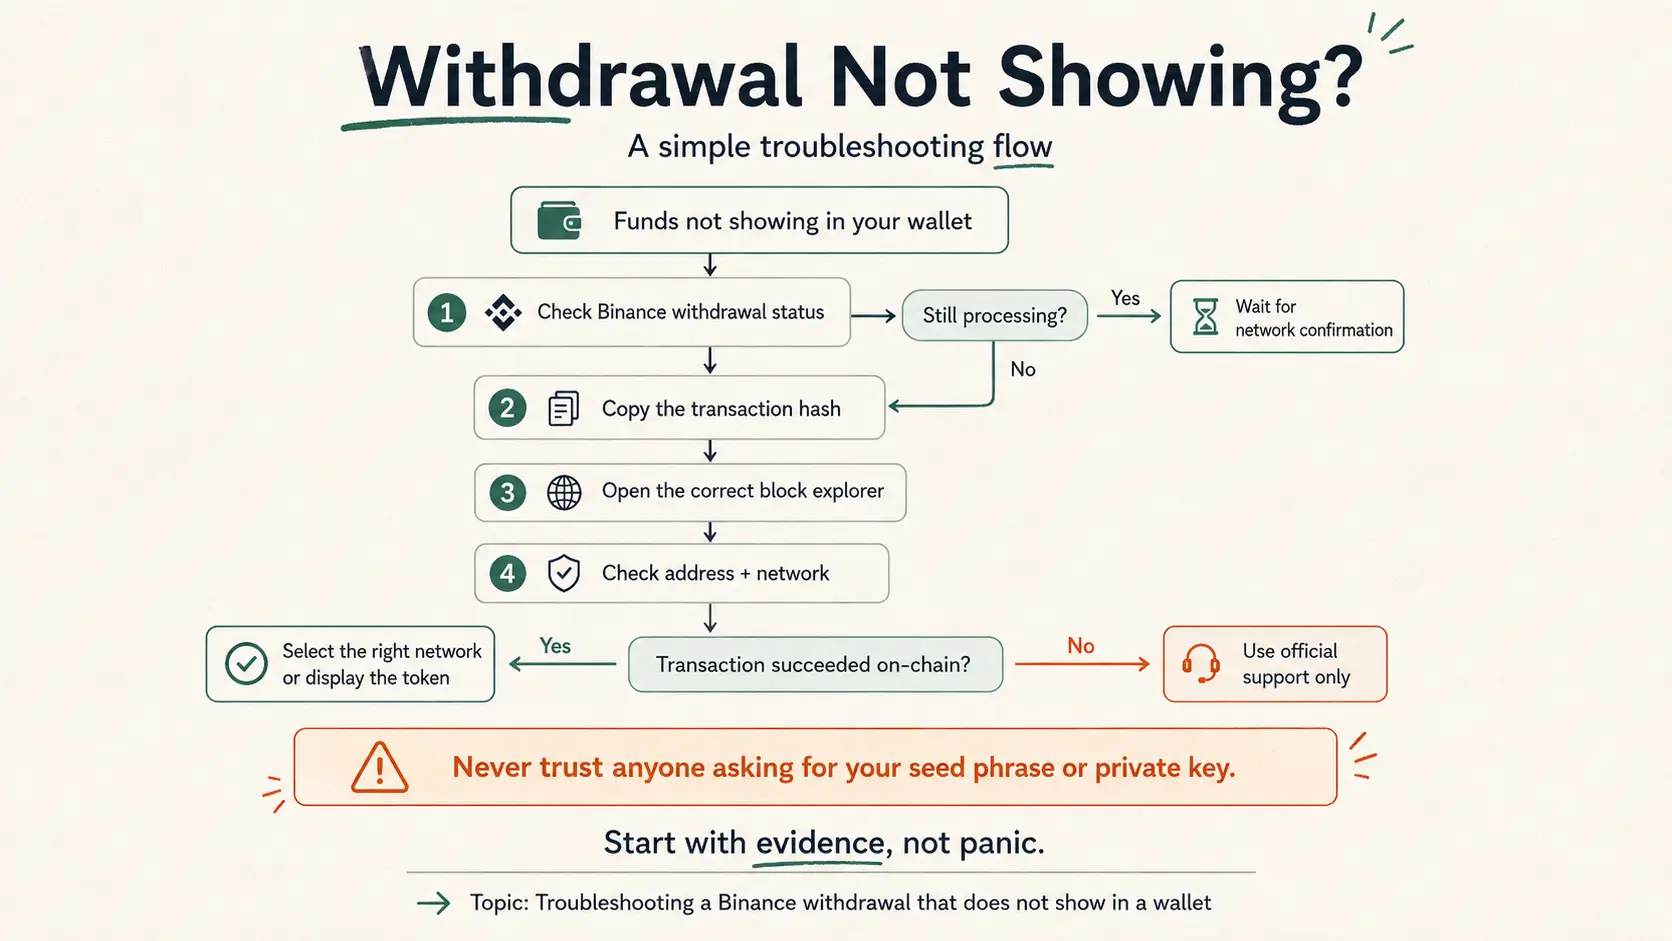
If you post publicly about a stuck transfer, scammers may contact you quickly. They may ask you to connect your wallet, reveal a phrase, scan a QR code, or “validate” your wallet. Do not do that. Real support does not need your seed phrase or private key.
A stranger asking for it is not support. They are the fire after the smoke.
Why use a passkey wallet after Binance?
The strongest reason is usability under pressure.
Old self-custody often gives users control, then leaves them alone with seed phrases, blind approvals, gas confusion, and unclear transaction screens. That may be acceptable for advanced users. It is not a friendly default for people who want to use crypto without turning every action into a technical exam.
A seedless passkey wallet can reduce the burden of storing recovery words, but it does not make transfers automatic or consequence-free. You still need to understand the asset, the network, the address, and your recovery path.
For users leaving Binance because they want more control, the real win is not “moving fast.” It is moving carefully into a wallet setup they can actually use again tomorrow.
What if your Binance withdrawal does not show up?
Do not start with panic. Start with evidence. First, check the withdrawal status inside Binance. Then copy the transaction hash and search it on the correct block explorer. Look at the destination address, the network used, and the token contract.
What to check | Why it matters | What to do next |
Withdrawal status | Confirms whether Binance submitted the transaction | Wait if still processing |
Transaction hash | Lets you inspect the transfer on-chain | Search it on the correct explorer |
Destination address | Confirms whether funds went to your wallet | Compare it with your receive address |
Network used | Confirms whether the route matches your wallet | Switch network or contact official support if needed |
Token contract | Confirms whether the token is displayable | Add or display the token if your wallet supports it |
If the transaction succeeded on-chain but your wallet shows no balance, the issue may be display-related. If the transaction went to the wrong address or unsupported network, stop before taking advice from strangers. Use official support routes only.
When should you not move everything at once?
Do not move everything at once if you are unsure which network to use, if you have never used the wallet before, if the asset is not clearly supported, or if your phone, passkey provider, or recovery setup is messy.
Self-custody is not a purity contest. You do not have to move your entire balance to prove a point. Many people use exchanges and self-custody wallets for different jobs: exchanges for buying and selling, wallets for ownership and on-chain use. If you are deciding how to split your setup, How Many Crypto Wallets Should You Have? is a useful next read.
The healthy question is: which tool should hold this specific crypto for this specific purpose?
A safer first move from Binance to self-custody
The right transfer is not the fastest one. It is the one you can explain back to yourself before you confirm it. You know the asset. You know the network. You know the address. You sent a test amount. You checked the transaction on-chain. Now the rest of the move is repetition, not gambling.
Ready to move from Binance into self-custody?
Create your walllet.com wallet first, copy the receive address from the official app, and send a small test transfer before moving more. Your first transfer should prove the route, not risk your full balance.
