
The hardest part of using Arbitrum is not the technology itself. It is knowing which small mistake can send your money into the fog.
To use Arbitrum, set up a compatible crypto wallet, choose Arbitrum One, keep ETH for gas fees, move funds through a supported exchange or bridge, check your balance on the right network, connect only to trusted dApps, and understand how withdrawals back to Ethereum work.
TL;DR
Arbitrum is an Ethereum Layer 2 network that helps users interact with Web3 apps faster and often with lower fees than Ethereum Mainnet.
You usually need ETH, not ARB, to pay gas fees on Arbitrum.
Start with a small test amount, check the network before every transfer, and read every wallet prompt before signing.
Official withdrawals from Arbitrum back to Ethereum through the Arbitrum Bridge can take at least seven days.
You hear that Arbitrum is faster and cheaper than Ethereum. You open your wallet, see networks, bridges, gas fees, tokens, and signing prompts, and suddenly the “easy” thing feels like a control panel with no labels.
Arbitrum is useful, but the first-time experience can be confusing because you are not just tapping one button. You are choosing a network, moving assets across chains, paying fees in the right token, and trusting the right website.
Once you understand the route, Arbitrum becomes much less intimidating. Think of it as learning which lane to drive in before entering a faster road.
What is Arbitrum in simple terms?
Arbitrum is a Layer 2 network built to scale Ethereum. It lets people use many Ethereum-style apps with faster transactions and lower fees, while still relying on Ethereum for important parts of its security.
Arbitrum’s official documentation describes it as a technology suite designed to scale Ethereum. Users can use Arbitrum chains for Web3 apps, smart contracts, and transactions that are usually cheaper and faster than on Ethereum Mainnet. You can read the official explanation in the Arbitrum introduction.
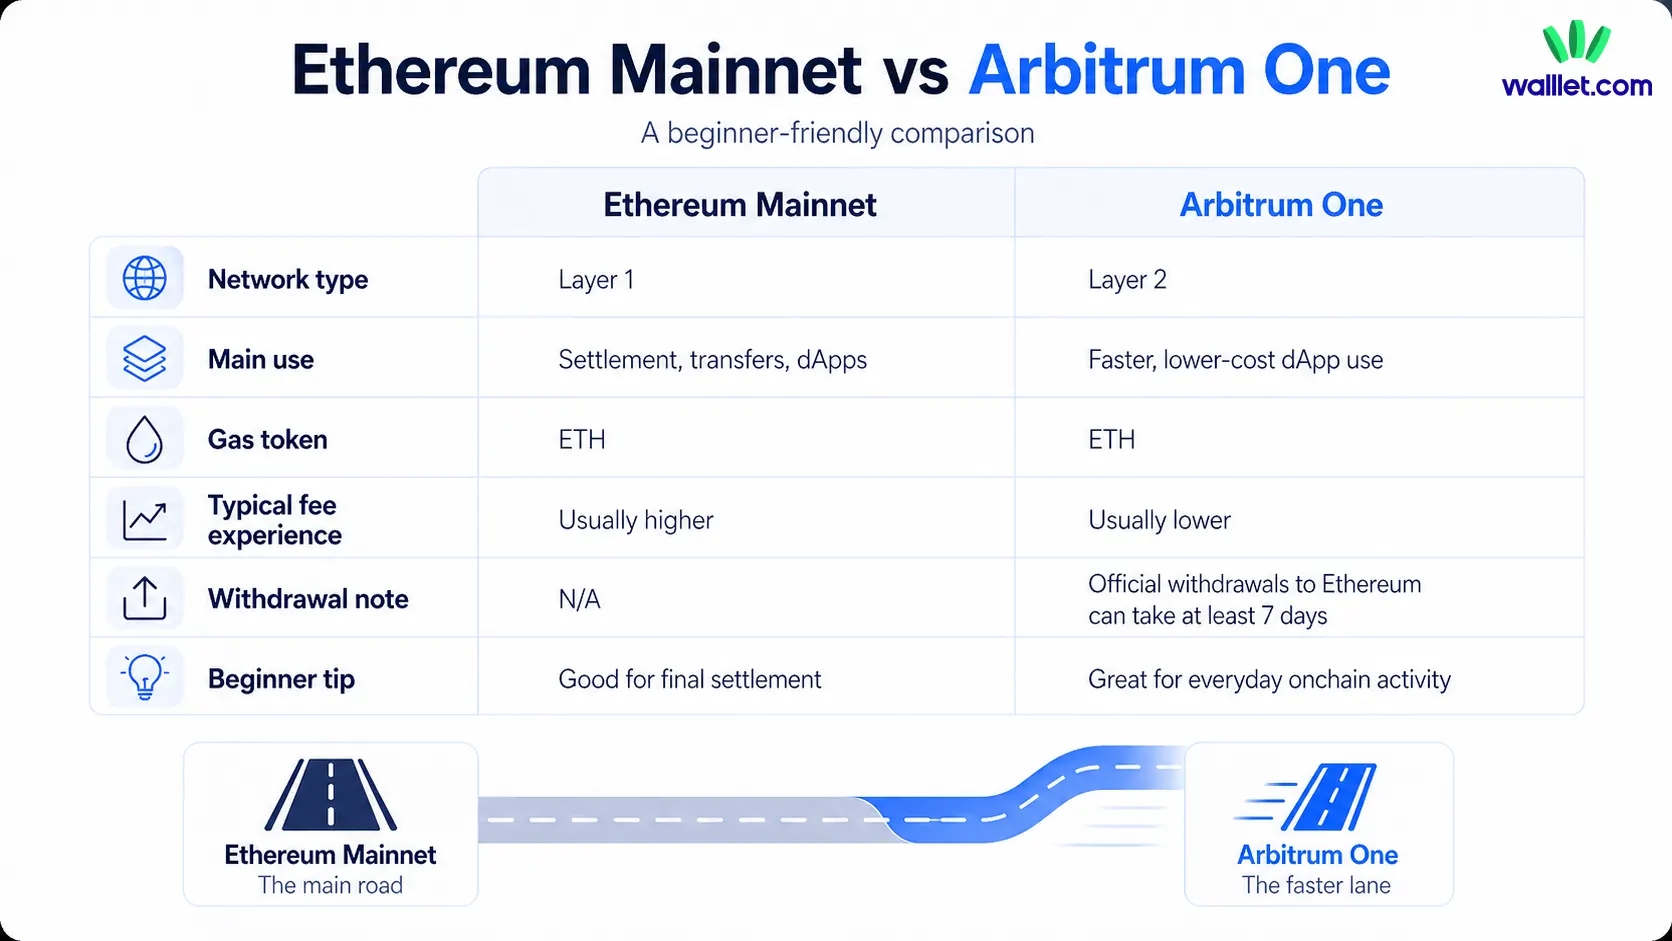
For beginners, the simplest mental model is this: Ethereum is the main settlement layer. Arbitrum is a faster lane built for everyday Web3 activity.
Question | Ethereum Mainnet | Arbitrum One | Beginner takeaway |
What is it? | Ethereum’s main network | An Ethereum Layer 2 network | Arbitrum is connected to Ethereum, not a separate universe |
What do you use it for? | Sending assets, using dApps, settling transactions | Sending assets, using dApps, paying lower fees | Many Ethereum-style actions work on Arbitrum |
What pays gas? | ETH | ETH | You need ETH on the correct network |
Is it always fast to leave? | Not relevant | Official withdrawals to Ethereum can take days | Plan before moving large funds |
Is it beginner-friendly? | Familiar, but often expensive | Cheaper, but network mistakes are common | Start small and check every step |
If you are still new to what a wallet actually does, start with What Is a Crypto Wallet?. It explains why your wallet is not where your coins “live,” but the tool that lets you control them.
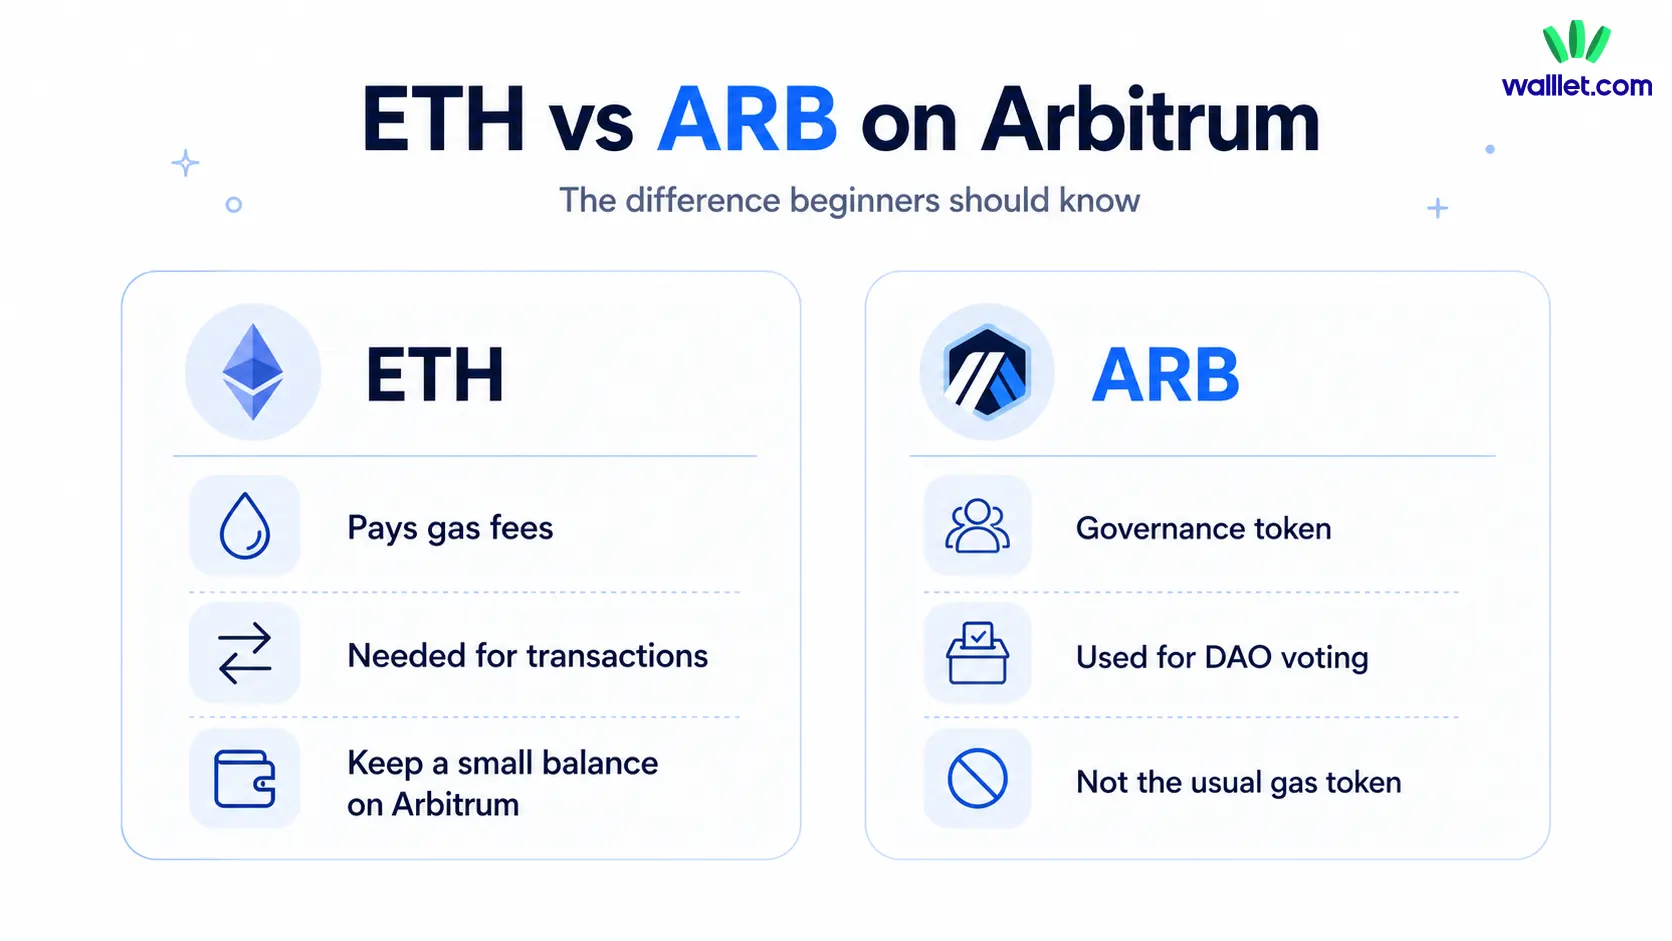
Do you need ARB or ETH to use Arbitrum?
You usually need ETH to use Arbitrum because ETH is the currency used to pay gas fees on the network. This is one of the most common beginner mistakes.
The network is called Arbitrum, and the token is called ARB, so many users assume ARB is needed for fees. But ARB is not the normal gas token for everyday Arbitrum transactions. The Arbitrum Foundation describes ARB as a governance token that lets holders participate in Arbitrum DAO governance.
A simple rule helps:
Keep a small amount of ETH on Arbitrum before you swap, send, bridge, mint, or use any dApp.
Imagine arriving in a new country with a gift card but no local cash for the train. The gift card may have value, but it will not open the ticket gate. On Arbitrum, ETH is the small bit of “local cash” that lets transactions move.
What should you prepare before using Arbitrum?
Before your first Arbitrum transaction, prepare three things: a compatible wallet, ETH for gas, and a safe route for moving funds.
A Web3 wallet is required because you need somewhere to hold your assets, connect to apps, and approve transactions. Arbitrum’s bridge quickstart says users need a Web3 wallet before using the Arbitrum Bridge.
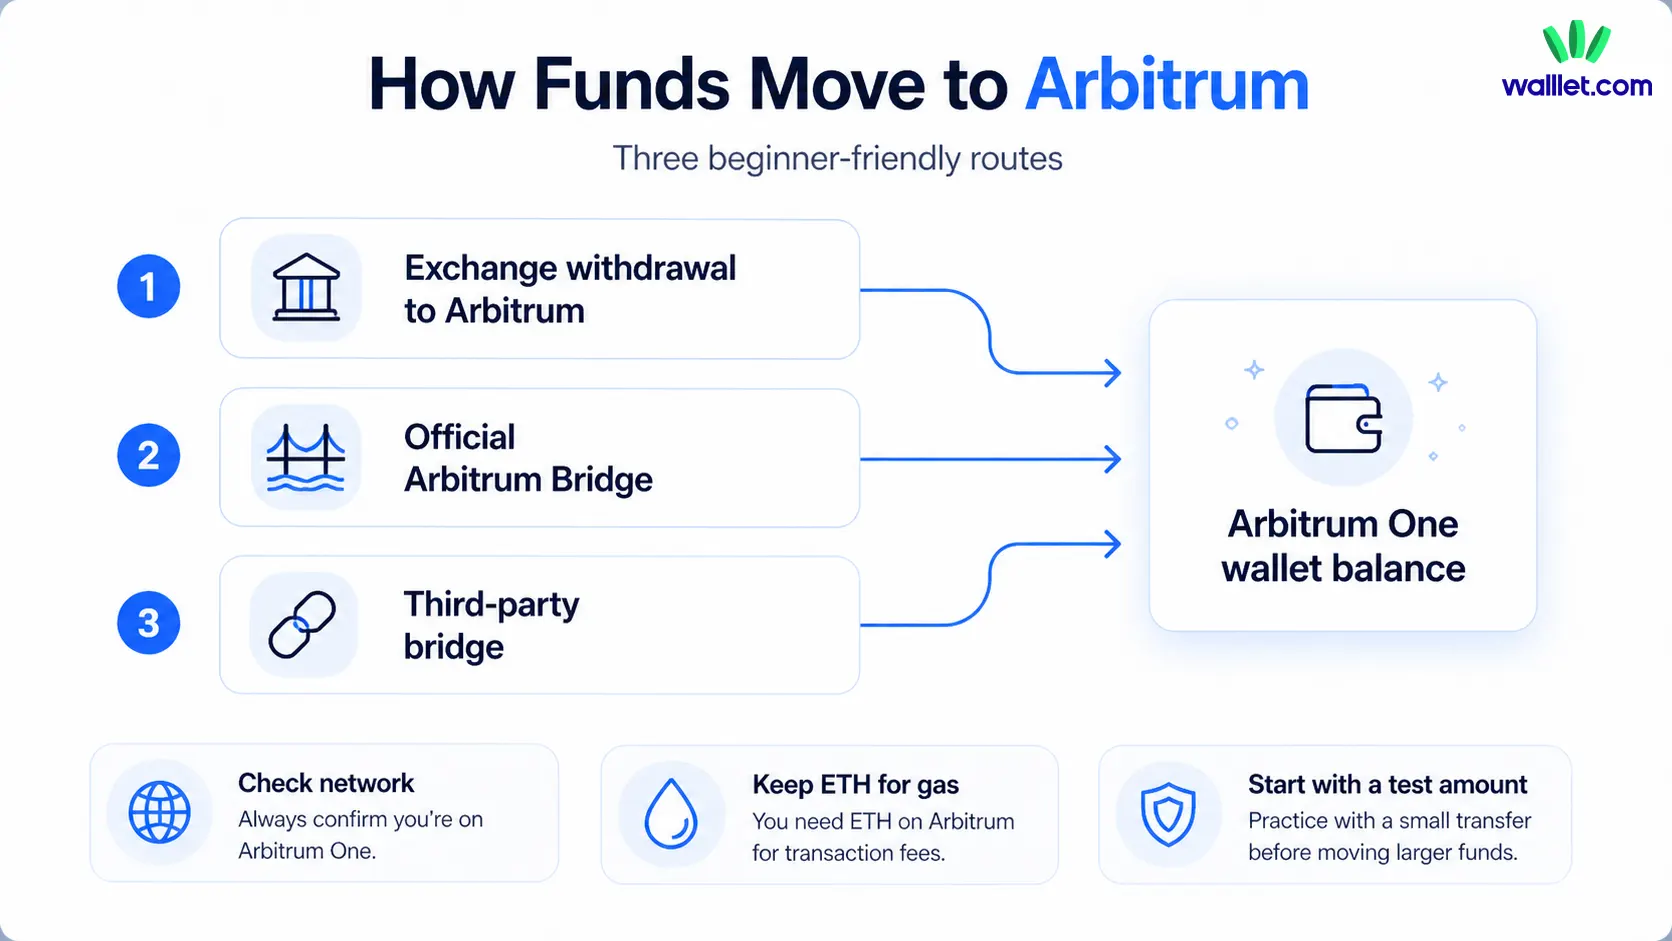
You should also decide how to get funds onto Arbitrum. Most beginners use one of three routes: a direct exchange withdrawal to Arbitrum, the official Arbitrum Bridge, or a third-party bridge.
Each route has a tradeoff. Exchange withdrawals can be easier when supported, but choosing the wrong network can create serious problems. The official bridge is clearer and well-documented, but withdrawals back to Ethereum can take time. Third-party bridges may offer more options, but they introduce extra trust and smart contract risk.
Do not start with your full balance. A small test transfer is not glamorous, but it is the crypto version of checking the door before carrying in the furniture.
Step 1: Choose a wallet that supports Arbitrum
Your wallet is where you select Arbitrum, view balances, approve transactions, and connect to apps. Some wallets detect Arbitrum automatically when a dApp requests it. Others require you to add the network manually.
For beginners, the best wallet is not only the one with the most features. It is the one that helps you understand what you are approving.
A confusing wallet can turn a simple transaction into a guessing game. Before using Arbitrum seriously, make sure your wallet lets you clearly see the network, asset, amount, recipient, and permission being requested.
If you are comparing wallet options, Best Ethereum Layer 2 Wallets is a useful next read because Arbitrum is part of the broader Layer 2 wallet problem: the wallet has to support more than one chain without making the user feel lost.
Step 2: Add or select Arbitrum One in your wallet
Most beginners looking for Arbitrum should start with Arbitrum One. It is the main Arbitrum rollup chain used for many DeFi and Web3 apps.
The official Arbitrum Bridge documentation lists these common details for Arbitrum One:
Field | Arbitrum One |
Network name | Arbitrum One |
Chain ID | 42161 |
Currency symbol | ETH |
Block explorer | Arbiscan |
If your wallet does not already show Arbitrum One, you may need to add it through the wallet’s network settings or through a trusted dApp prompt. Only use official or trusted sources when adding network details. Fake network prompts and fake bridge sites are quiet trapdoors in Web3.
Your wallet address may look the same on Ethereum and Arbitrum, but the networks are different. If your funds are on Ethereum Mainnet, they are not automatically on Arbitrum. That is why some users panic after bridging. The assets may have arrived, but the wallet is still looking at the wrong chain.
For a deeper explanation of this difference, read Web3 Account vs Wallet Address vs Private Key. It helps separate the wallet, the address, and the account behind the scenes.
Step 3: Get ETH for gas on Arbitrum
You need ETH on Arbitrum to pay Arbitrum transaction fees. ETH on Ethereum pays Ethereum transactions. ETH on Arbitrum pays Arbitrum transactions.
That difference matters. A user can have ETH on Ethereum Mainnet and still be unable to make a transaction on Arbitrum if they do not have ETH on Arbitrum.
You can get ETH on Arbitrum in a few common ways. You can withdraw ETH from an exchange directly to Arbitrum if the exchange supports it. You can bridge ETH from Ethereum to Arbitrum. You can receive ETH on Arbitrum from another wallet. In some regions, you may also be able to use an on-ramp that supports Arbitrum.
For your first transaction, keep the amount small. A few dollars of ETH may be enough for many simple interactions, but fees vary depending on network activity and the action you take.
The important point is this: having tokens on Arbitrum is not enough. You also need the right fee token on the right network.
Step 4: Move funds to Arbitrum
Once your wallet is ready, you need to move funds onto Arbitrum. This is where beginners should slow down.
If your exchange supports Arbitrum withdrawals, that may be the simplest route. You choose the token, select Arbitrum or Arbitrum One as the withdrawal network, enter your wallet address, and confirm. The danger is choosing the wrong network. If an exchange shows Ethereum, Arbitrum, Optimism, Base, BNB Chain, or another network, do not guess.
You can also use the official Arbitrum Bridge. The process is usually: connect your wallet, choose the source network, choose Arbitrum One as the destination, select the token, enter the amount, and confirm the wallet prompts.
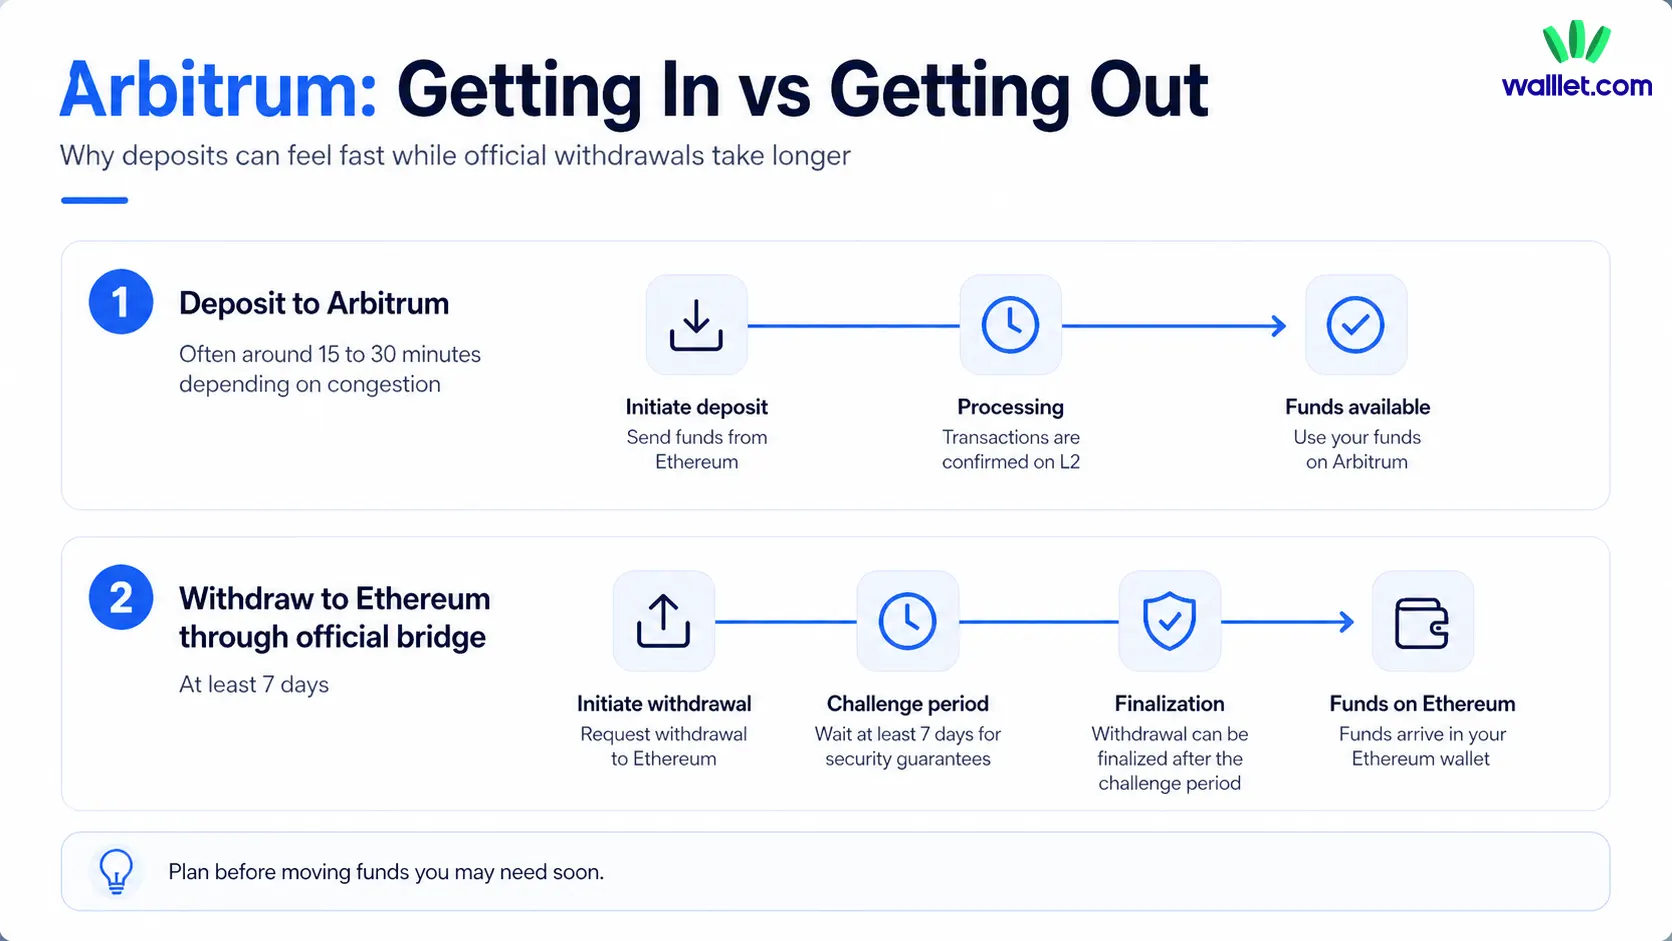
Arbitrum’s bridge docs say deposits may arrive on the destination chain in roughly 15 to 30 minutes, depending on congestion. But withdrawals from Arbitrum One or Nova back to Ethereum through the official bridge require at least seven days.
Third-party bridges may offer faster or more flexible routes, but they add extra risk. For a beginner, this does not mean “never use bridges.” It means use trusted routes, avoid random links from social media, and never bridge more than you are ready to track carefully.
Step 5: Check that your funds arrived
After moving funds, open your wallet and switch to Arbitrum One. If your wallet is still on Ethereum Mainnet, your Arbitrum balance may not appear.
If the token does not show automatically, you may need to add the token contract to your wallet. Be careful here. Use trusted sources for token contract addresses, not screenshots, comments, or random search results.
You can also check your transaction on Arbiscan, the block explorer for Arbitrum One. A block explorer is a public search tool for blockchain activity. It lets you look up wallet addresses, transaction hashes, token transfers, and contract interactions.
If you are checking a token before swapping or importing it, How to Verify a Token Contract Address is the right internal follow-up. It explains why a ticker or token logo is not enough.
If your funds do not appear, check the network first. Then check the wallet address, transaction hash, bridge status, and token visibility. If you sent funds to an exchange or wallet that does not support the Arbitrum network you used, Arbitrum cannot recover them for you. You would need to contact that platform’s support.
Step 6: Use Arbitrum dApps safely
Once you have funds on Arbitrum, you can use dApps. A dApp is a decentralized app, such as a swap platform, lending app, NFT marketplace, game, DAO tool, or bridge interface.
Common actions on Arbitrum include sending ETH or tokens, swapping assets, using DeFi apps, minting NFTs, checking transaction history, and connecting to ecosystem tools.
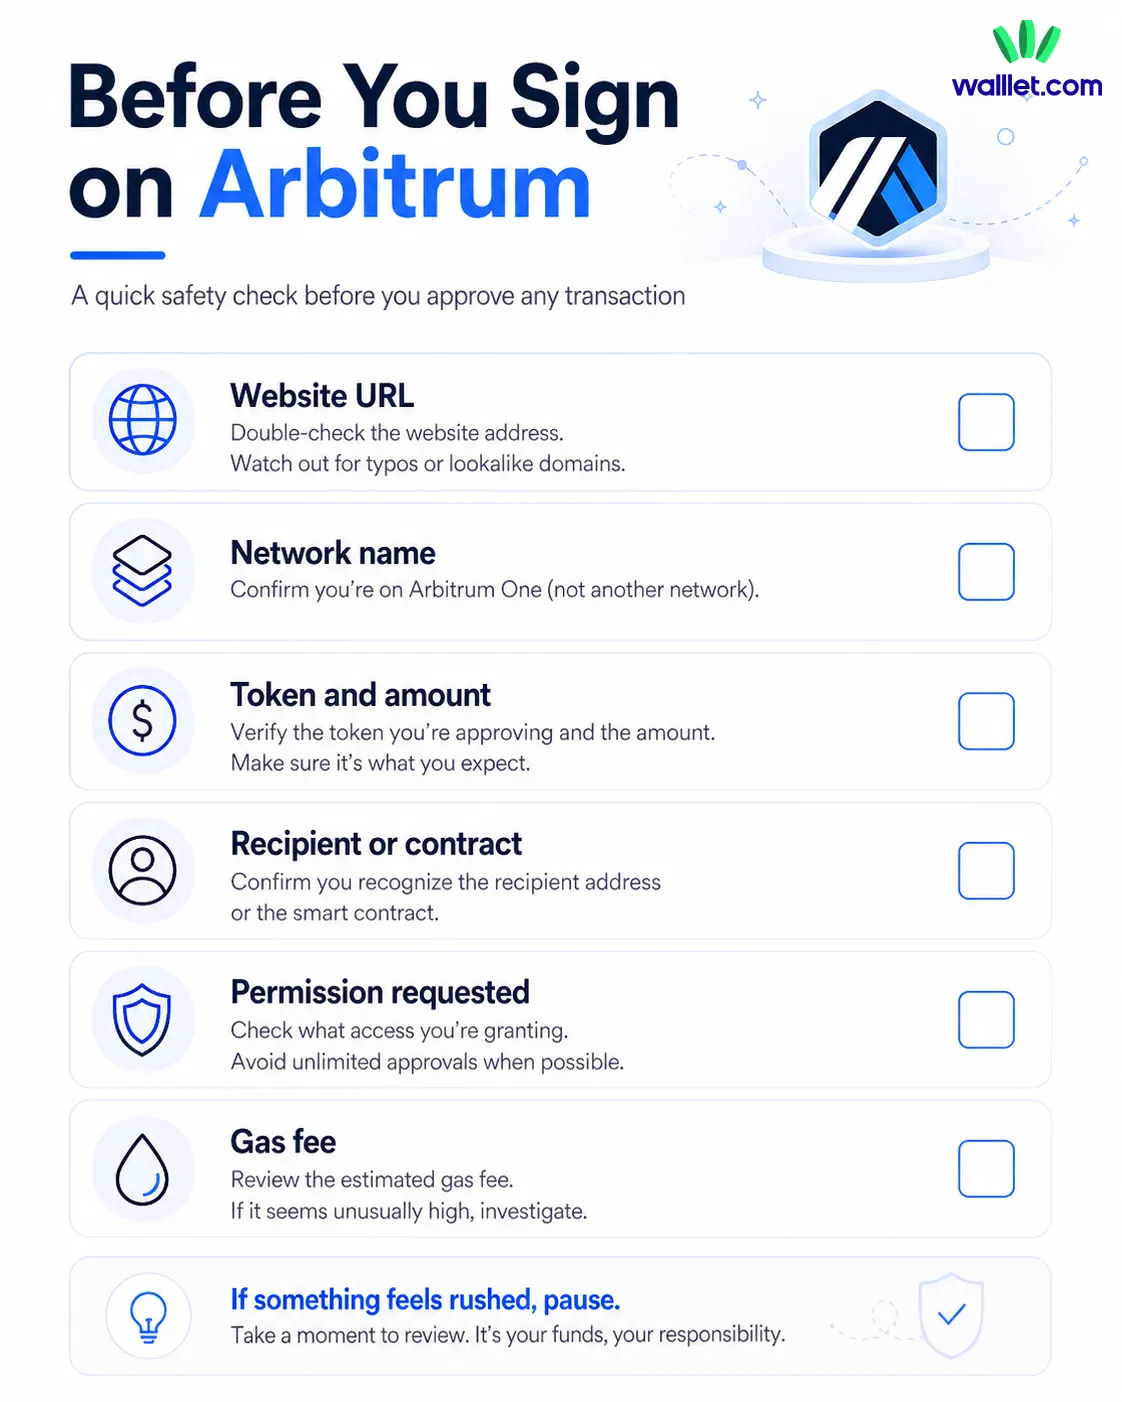
The safety step is not only choosing the right app. It is reading the wallet prompt before signing.
A transaction prompt can ask you to send funds, swap tokens, approve token spending, or give a contract permission. These are not the same thing. Approving a transaction without understanding the permission is one of the easiest ways to create unnecessary risk.
If you are new to DeFi and wallet connections, read What Is DeFi?. It gives better context for why wallets matter when you start using lending, swaps, and other onchain apps.
Before signing anything on Arbitrum, check the website URL, network name, token amount, recipient or contract, permission being requested, and gas fee. If something feels rushed, pause. Real dApps do not need you to panic-click.
What kind of wallet makes Arbitrum easier for beginners?
A beginner-friendly Arbitrum wallet should do more than show balances. It should help users understand what is happening before they approve an action.
That is where wallet UX matters. The hardest Arbitrum mistakes often happen at the wallet layer: choosing the wrong network, missing the gas token, importing the wrong token contract, approving too much access, or signing a transaction without understanding it.
walllet.com is relevant here because its product direction focuses on self-custody without the old seed phrase burden. A seedless setup, passkey-based access, biometric authentication, and clearer transaction prompts can make everyday crypto actions feel less fragile for non-technical users.
The point is not that a wallet can remove every risk. It cannot. The point is that a better wallet should make risky moments easier to recognize. On Arbitrum, that means helping the user see the network, asset, amount, permission, and possible warning signs before they sign.
For a broader checklist, read How to Tell if a Crypto Wallet Is Safe Before You Use It. It is especially useful before choosing a wallet for Layer 2 networks like Arbitrum.
Step 7: Know how to withdraw or exit
Using Arbitrum is not only about getting in. You should know how to get out before you move meaningful funds.
If you withdraw from Arbitrum One or Arbitrum Nova to Ethereum through the official Arbitrum Bridge, the bridge docs say you must wait at least seven days to receive funds on Ethereum Mainnet. The interface may show a countdown of 7 to 8 days.
This delay surprises many beginners. Depositing into Arbitrum can feel fast, but withdrawing through the canonical bridge route is different.
You may see faster third-party exit options. Those can be useful, but they come with their own fees and risks. For beginners, the key is simple: do not move funds to Arbitrum if you may urgently need them back on Ethereum tomorrow.
Is Arbitrum safe for beginners?
Arbitrum can be beginner-friendly, but it is not risk-free.
The main risks are usually practical: wrong-network transfers, fake bridge links, unsafe approvals, hidden withdrawal delays, and confusing ETH with ARB. Most of these problems do not come from “Arbitrum being too hard.” They come from moving too quickly through steps that deserve attention.
A safer first-time route looks like this: set up your wallet, select Arbitrum One, move a small test amount, confirm the funds arrived, try one simple transaction, keep some ETH for gas, and avoid signing anything you do not understand.
That sequence may feel slow, but it keeps the learning curve from becoming a tuition bill.
What are the most common Arbitrum beginner mistakes?
The most common mistake is sending funds on the wrong network. A user may copy the right wallet address but choose the wrong withdrawal network from an exchange. The address looks familiar, so they assume everything is fine. But blockchain networks are separate routes, even when the wallet address looks the same.
Another common mistake is buying ARB and assuming it will pay for gas. ARB has a role in governance, but ETH is the token generally used to pay gas on Arbitrum.
Beginners also get caught by the withdrawal delay. If you bridge into Arbitrum and later want to exit through the official bridge, the wait can be at least seven days.
The quietest mistake is approving too much. Some dApps ask for permission to spend a token. That may be normal in certain cases, but unlimited approvals can create risk if the app or contract is malicious or later compromised.
Read the prompt. If the wallet makes the prompt unreadable, that is not a small UX problem. That is a safety problem.
How should beginners think about Arbitrum?
Arbitrum is not something you need to master before using it. You need a small set of habits.
Check the network. Keep ETH for gas. Start with small amounts. Use trusted bridges. Read wallet prompts. Know that official withdrawals to Ethereum can take time.
That is the whole map.
Once those habits are in place, Arbitrum starts to feel less like a technical maze and more like a practical way to use Ethereum-style apps with less friction. The goal is not to become a blockchain engineer. The goal is to make your next transaction with your eyes open.
Download walllet to manage crypto with a simpler self-custodial wallet experience.
