
Wallet migration is not “moving a wallet.” It’s moving assets, permissions, and habits, in the right order.
Ready to move to walllet.com? Follow this step-by-step migration guide: create your new wallet, transfer assets safely, verify on a block explorer, clean up old dApp connections and approvals, and avoid common mistakes.
TL;DR
Migrating to walllet.com usually means creating a fresh wallet (seedless, passkey-based) and transferring assets from your old wallet or exchange to your new address. The safest approach is:
Create your walllet.com wallet and confirm your passkey is set up properly (passkeys are tied to device unlock and stored in a credential manager).
Make an inventory: tokens, DeFi positions, and which networks they are on.
Do a small test transfer first, then move the rest.
Verify each move on a block explorer (it’s the source of truth).
Clean up old risk: disconnect old WalletConnect sessions and revoke unused token approvals, because approvals can remain even after you “disconnect.”
Here is a practical migration plan for moving from exchanges or seed-phrase wallets to a seedless, passkey-based wallet, with checklists for tokens, and dApp clean-up.
Step | What You Do | Why It Matters | Quick Tip |
|---|---|---|---|
1 | Create your walllet.com wallet and set up your passkey | Establishes your new secure address before moving anything | Make sure your device lock and credential manager are active |
2 | Make an inventory of assets (tokens, NFTs, DeFi positions) | Prevents forgetting assets or checking the wrong network | Write down asset name, location, and network |
3 | Choose the correct transfer route (same-chain or cross-chain) | Avoids sending assets on the wrong network | Always match the sending network with the receiving network |
4 | Send a small test transfer | Confirms the address and network are correct before moving large funds | Test with a small amount that you can verify easily |
5 | Transfer the main balance | Moves your assets once the route is confirmed | For large portfolios, move assets in batches |
6 | Verify each transaction in a block explorer | Block explorers show the real blockchain record | Save the TxID as a receipt |
7 | Disconnect old dApp sessions | Stops previous WalletConnect connections from interacting with your wallet | Check “Connected Sites” or “WalletConnect Sessions” |
8 | Revoke unused token approvals | Removes smart-contract permissions that could spend tokens | Tools like approval managers can help review permissions |
9 | Keep the old wallet as an archive | Preserves history while minimizing risk | Leave minimal funds and no active approvals |
If you’ve ever tried switching wallets, you already know the feeling. You open two apps, copy an address, stare at network names, and suddenly everything feels too important to do fast. Here’s the good news: most wallet migrations are safe when you treat them like a checklist, not a sprint. The main mistakes happen when people rush, skip verification, or mix up networks.
This guide walks you through a clean migration to walllet.com, with clear steps for three common situations:
Moving from an exchange to walllet.com
Moving from another self-custody wallet to walllet.com
Cleaning up old dApp connections and approvals so your previous wallet is not a hidden liability
First, what “migrating a wallet” really means
In crypto, your “wallet” is not a box that holds coins. It’s access to addresses on a blockchain. So migration usually means one of two things:
You create a new address (new wallet setup), then transfer assets to it.
You import the same keys into a different wallet app (not always recommended, and not always aligned with seedless designs).
Most people should aim for option #1: a fresh setup and deliberate transfers. It’s also the model that many security guides for migration focus on: create a new wallet, get a safe address, transfer your assets carefully.
What changes when you move to walllet.com
walllet.com is built around a seedless, passkey-based approach, so the setup experience and security model are closer to “secure sign-in” than “write 12 words and pray.”
Passkeys are FIDO credentials tied to how you unlock your device (Face ID, fingerprint, PIN), and can be stored and synced through credential managers such as Google Password Manager on Android/Chrome.
Practical implication: migrating to walllet.com typically looks like creating your new walllet.com wallet first, then transferring assets to it.
The migration plan to walllet.com
If you want a safe order of operations, use this:
Create your walllet.com wallet
Inventory what you own (and where it lives)
Pick the right route (same-chain transfer vs cross-chain move)
Test transfer
Main transfer
Verify in a block explorer
Clean up old wallet connections and approvals
We’ll go step by step.
Step 1: Create your walllet.com and lock in access
Set up passkeys the “boring” way
This is one of those moments where boring wins. Make sure:
Your device has a screen lock set (PIN/biometric).
Your passkey is stored in a credential manager you actually use. Google’s docs explain that passkeys are encrypted on-device and can sync via Google Password Manager for Android/Chrome setups.
If you use multiple devices, decide whether you want synced passkeys (convenience) or device-bound behavior (tighter control). The right choice depends on your personal risk tolerance.
Related: Use passkeys on iPhone without Apple ID 2FA
Write down your “public” migration info, not secrets
You will need:
Your new walllet.com receiving address (public)
The networks you plan to use for transfers (public info)
You do not need to write down any seed phrase for walllet.com setup. That is the point of a seedless design.
Step 2: Make an inventory before you move anything
This is where people skip, then regret it. Make a quick list with three columns:
Asset (USDC, ETH, NFT collection name, staked position)
Where it is now (Exchange, MetaMask, Trust Wallet, another address)
Network (Ethereum, Base, Arbitrum, Polygon, etc.)
Why this matters: “missing funds” incidents often come from looking at the wrong chain. Block explorers make this obvious, wallets sometimes do not.
Step 3: Choose the right migration route for your situation
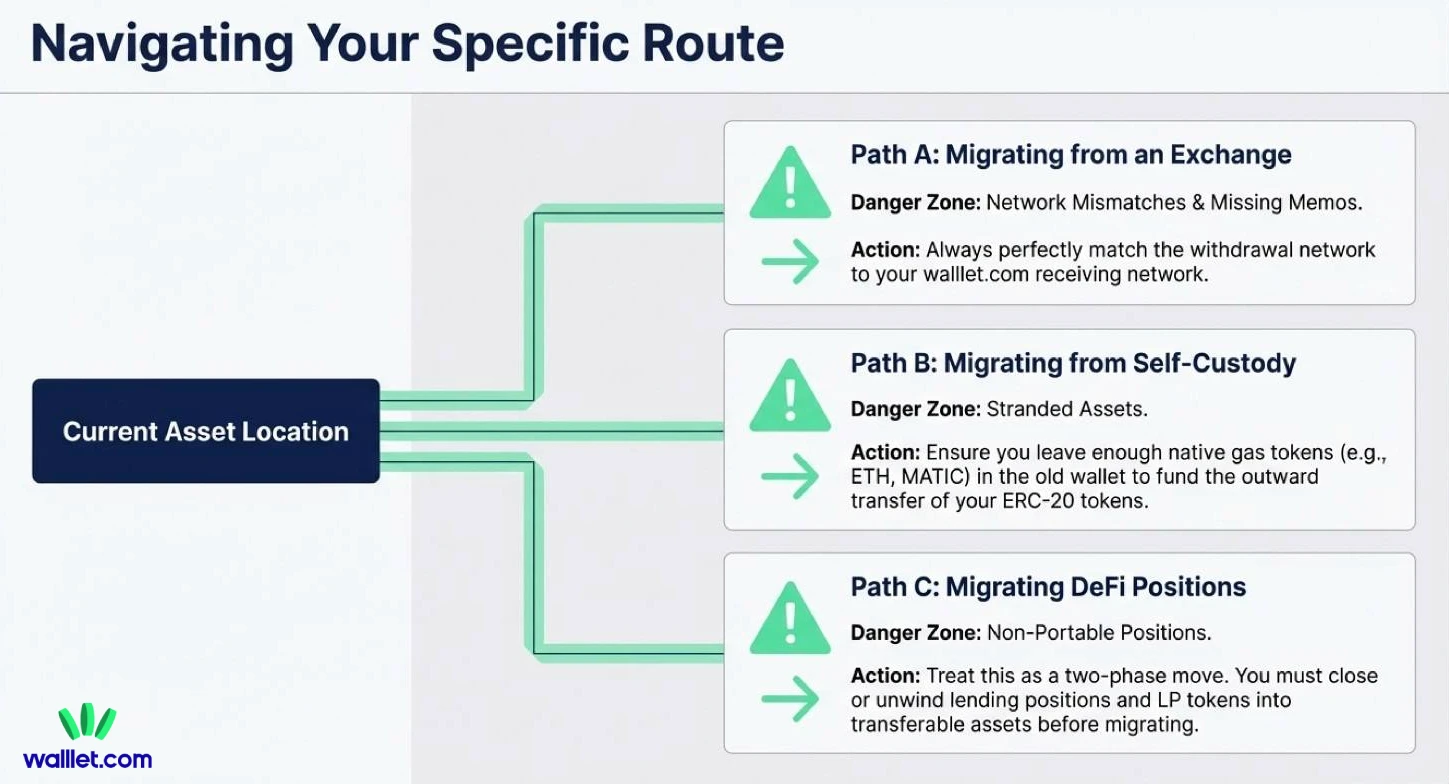
Scenario A: Migrating from an exchange to walllet.com
This is the most common migration, and the most common place for network mistakes. Do this:
Copy your walllet.com address
Start a small test withdrawal from the exchange
On the exchange withdrawal screen, match the network to the network you intend to receive on
Confirm the TxID and verify it on a block explorer
If the exchange asks for a memo/tag, that’s usually for certain chains or assets. If you do not know, pause and check. A wrong network or missing memo can create delays or support tickets.
Scenario B: Migrating from another self-custody wallet (MetaMask, Trust Wallet, etc.)
This is usually a simple send transaction on the same network. What you need to avoid:
Sending on the wrong chain
Forgetting that you need the chain’s gas token to send (for example, you need ETH on that network to move ERC-20 tokens)
A clean approach is to switch your old wallet to the correct network, send a test amount to your walllet.com address and then send the remaining balance
Scenario C: Migrating DeFi positions
This is where “migration” is not always a transfer. Many DeFi positions are not portable like tokens. If you have lending positions, LP tokens or staked assets, you may need to unwind or close them first, then move the resulting tokens to walllet.com. Treat DeFi migration as two phases:
Close or convert positions to transferable assets
Transfer those assets to walllet.com
Step 4: Do a small test transfer (always!)
This step feels slow until it saves you. A test transfer should be:
On the exact same network you plan to use
Large enough to be visible, small enough to be painless
Then verify the test on a block explorer.
Why block explorers matter here
Wallet UIs can lag, hide tokens, or fail to auto-detect. A block explorer shows the ledger itself and helps you confirm the recipient address and token transfer.
Step 5: Move the rest, in batches if needed
Once the test arrives, transfer the main balance, for multiple assets, consider moving your highest-value assets first while you are fully focused and If you need cross-chain moves, do them intentionally.
If your migration includes swapping and moving across networks, walllet.com’s cross-chain approach can reduce the amount of manual network switching you have to do, which is where many mistakes happen.
Step 6: Verify every move and keep receipts
After each important transfer:
Save the TxID
Check it on an explorer
Confirm the recipient address and the token amount
If you ever need support from an exchange, or you need to prove a transfer, TxIDs are your receipts.
Related: How to Read a Crypto Transaction on a Block Explorer
Step 7: Clean up the old wallet (this is where most people forget)
After migration, your old wallet can still have active risk attached to it. Two concepts matter:
Connected sessions (WalletConnect connections)
Token approvals (permissions for smart contracts to spend your tokens)
They are not the same, and removing one does not remove the other.
Disconnect old WalletConnect sessions
WalletConnect sessions are active connections between your wallet and dApps. Trust Wallet’s guide explains you can view and end sessions from a sessions/settings area. Other wallets have similar menus (often called “Connected sites” or “WalletConnect sessions”), and many support a “disconnect all” option.
What this does: it stops the dApp from continuing to ping your wallet in that session.
Revoke unused token approvals
Token approvals are on-chain permissions. They can remain active long after you stop using a dApp.
Revoke.cash explains token approvals simply: you grant a dApp permission to spend tokens or NFTs, and if you don’t revoke, that permission can remain. They also provide a step-by-step guide on how to revoke approvals. This is especially important if your old wallet interacted with lots of DeFi apps or NFT marketplaces.
Keep your old wallet, but treat it like an archive
You may still need it for old transaction history, tax or accounting records or proof of ownership for older activity. But after you migrate, you want it to have:
No active sessions
Minimal approvals
Low balances
Common wallet migration mistakes (and how to avoid them)
Mistake 1: Moving everything in one shot. Fix: test transfer first, then main transfer.
Mistake 2: Mixing up networks because the token name looks the same. Fix: match network on both ends, and verify with the explorer.
Mistake 3: Thinking “disconnect” removes permissions. Fix: disconnect sessions and revoke approvals. They solve different risks.
Mistake 4: Migrating during chaos. Fix: do it when you can focus for 20 minutes. Migration is a calm activity.
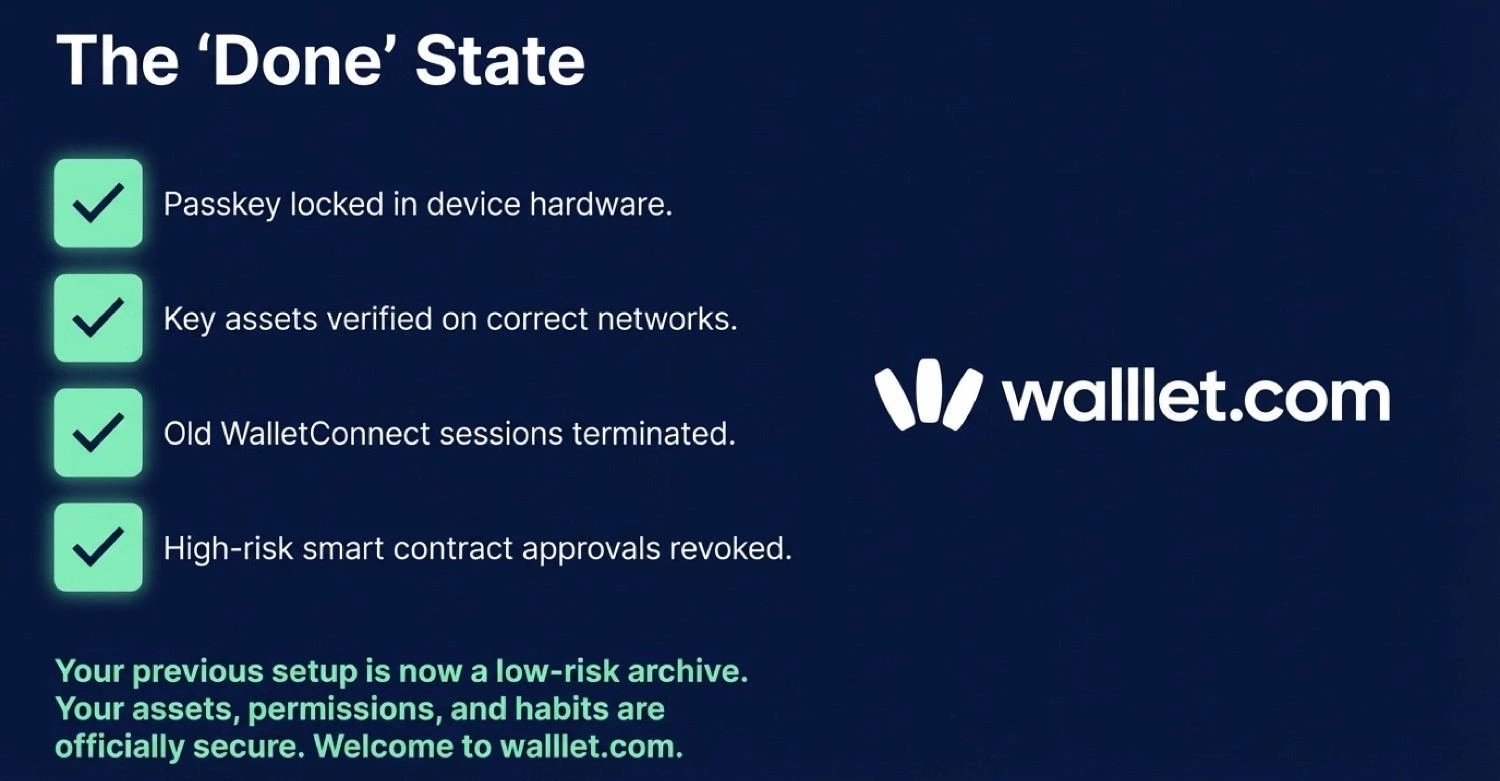
A checklist for migrating to walllet.com
You are done when:
Your key assets show in walllet.com on the correct networks
Your test transfers and main transfers are verified on an explorer
Old wallet sessions are disconnected
High-risk approvals are revoked
Your old wallet is treated as an archive, not your daily driver
Create your wallet on walllet.com, do a test transfer on the correct network, verify it on a block explorer, then migrate the rest. Once you’re done, clean up your old wallet by disconnecting sessions and revoking approvals so your previous setup becomes a low-risk archive.
